leave v2: คุณกำลังดูกระทู้
You’re browsing the documentation for v2.x and earlier.
For v3.x, click here.
Table of Contents
Enter/Leave & List Transitions
Overview
Vue provides a variety of ways to apply transition effects when items are inserted, updated, or removed from the DOM. This includes tools to:
- automatically apply classes for CSS transitions and animations
- integrate 3rd-party CSS animation libraries, such as Animate.css
- use JavaScript to directly manipulate the DOM during transition hooks
- integrate 3rd-party JavaScript animation libraries, such as Velocity.js
On this page, we’ll only cover entering, leaving, and list transitions, but you can see the next section for managing state transitions.
Transitioning Single Elements/Components
Vue provides a transition wrapper component, allowing you to add entering/leaving transitions for any element or component in the following contexts:
- Conditional rendering (using
v-if) - Conditional display (using
v-show) - Dynamic components
- Component root nodes
This is what an example looks like in action:
<
div
id
="demo"
>
<
button
v-on:click
="show = !show"
>
Toggle
</
button
>
<
transition
name
="fade"
>
<
p
v-if
="show"
>hello</
p
>
</
transition
>
</
div
>new
Vue({
el
: '#demo'
,
data
: {
show
: true
}
}).fade-enter-active
, .fade-leave-active
{
transition
: opacity .5s
;
}
.fade-enter
, .fade-leave-to
{
opacity
: 0
;
}hello
When an element wrapped in a transition component is inserted or removed, this is what happens:
-
Vue will automatically sniff whether the target element has CSS transitions or animations applied. If it does, CSS transition classes will be added/removed at appropriate timings.
-
If the transition component provided JavaScript hooks, these hooks will be called at appropriate timings.
-
If no CSS transitions/animations are detected and no JavaScript hooks are provided, the DOM operations for insertion and/or removal will be executed immediately on next frame (Note: this is a browser animation frame, different from Vue’s concept of
nextTick).
Transition Classes
There are six classes applied for enter/leave transitions.
-
v-enter: Starting state for enter. Added before element is inserted, removed one frame after element is inserted. -
v-enter-active: Active state for enter. Applied during the entire entering phase. Added before element is inserted, removed when transition/animation finishes. This class can be used to define the duration, delay and easing curve for the entering transition. -
v-enter-to: Only available in versions 2.1.8+. Ending state for enter. Added one frame after element is inserted (at the same timev-enteris removed), removed when transition/animation finishes. -
v-leave: Starting state for leave. Added immediately when a leaving transition is triggered, removed after one frame. -
v-leave-active: Active state for leave. Applied during the entire leaving phase. Added immediately when leave transition is triggered, removed when the transition/animation finishes. This class can be used to define the duration, delay and easing curve for the leaving transition. -
v-leave-to: Only available in versions 2.1.8+. Ending state for leave. Added one frame after a leaving transition is triggered (at the same timev-leaveis removed), removed when the transition/animation finishes.
Each of these classes will be prefixed with the name of the transition. Here the v- prefix is the default when you use a <transition> element with no name. If you use <transition name="my-transition"> for example, then the v-enter class would instead be my-transition-enter.
v-enter-active and v-leave-active give you the ability to specify different easing curves for enter/leave transitions, which you’ll see an example of in the following section.
CSS Transitions
One of the most common transition types uses CSS transitions. Here’s an example:
<
div
id
="example-1"
>
<
button
@click
="show = !show"
>
Toggle render
</
button
>
<
transition
name
="slide-fade"
>
<
p
v-if
="show"
>hello</
p
>
</
transition
>
</
div
>new
Vue({
el
: '#example-1'
,
data
: {
show
: true
}
})
.slide-fade-enter-active
{
transition
: all .3s
ease;
}
.slide-fade-leave-active
{
transition
: all .8s
cubic-bezier
(1.0
, 0.5
, 0.8
, 1.0
);
}
.slide-fade-enter
, .slide-fade-leave-to
{
transform
: translateX
(10px
);
opacity
: 0
;
}hello
CSS Animations
CSS animations are applied in the same way as CSS transitions, the difference being that v-enter is not removed immediately after the element is inserted, but on an animationend event.
Here’s an example, omitting prefixed CSS rules for the sake of brevity:
<
div
id
="example-2"
>
<
button
@click
="show = !show"
>Toggle show</
button
>
<
transition
name
="bounce"
>
<
p
v-if
="show"
>Lorem ipsum dolor sit amet, consectetur adipiscing elit. Mauris facilisis enim libero, at lacinia diam fermentum id. Pellentesque habitant morbi tristique senectus et netus.</
p
>
</
transition
>
</
div
>new
Vue({
el
: '#example-2'
,
data
: {
show
: true
}
}).bounce-enter-active
{
animation
: bounce-in .5s
;
}
.bounce-leave-active
{
animation
: bounce-in .5s
reverse;
}
@keyframes
bounce-in {
0% {
transform
: scale
(0
);
}
50% {
transform
: scale
(1.5
);
}
100% {
transform
: scale
(1
);
}
}Lorem ipsum dolor sit amet, consectetur adipiscing elit. Mauris facilisis enim libero, at lacinia diam fermentum id. Pellentesque habitant morbi tristique senectus et netus.
Custom Transition Classes
You can also specify custom transition classes by providing the following attributes:
enter-classenter-active-classenter-to-class(2.1.8+)leave-classleave-active-classleave-to-class(2.1.8+)
These will override the conventional class names. This is especially useful when you want to combine Vue’s transition system with an existing CSS animation library, such as Animate.css.
Here’s an example:
<
link
href
="https://cdn.jsdelivr.net/npm/[email protected]"
rel
="stylesheet"
type
="text/css"
>
<
div
id
="example-3"
>
<
button
@click
="show = !show"
>
Toggle render
</
button
>
<
transition
name
="custom-classes-transition"
enter-active-class
="animated tada"
leave-active-class
="animated bounceOutRight"
>
<
p
v-if
="show"
>hello</
p
>
</
transition
>
</
div
>new
Vue({
el
: '#example-3'
,
data
: {
show
: true
}
})hello
Using Transitions and Animations Together
Vue needs to attach event listeners in order to know when a transition has ended. It can either be transitionend or animationend, depending on the type of CSS rules applied. If you are only using one or the other, Vue can automatically detect the correct type.
However, in some cases you may want to have both on the same element, for example having a CSS animation triggered by Vue, along with a CSS transition effect on hover. In these cases, you will have to explicitly declare the type you want Vue to care about in a type attribute, with a value of either animation or transition.
Explicit Transition Durations
New in 2.2.0+
In most cases, Vue can automatically figure out when the transition has finished. By default, Vue waits for the first transitionend or animationend event on the root transition element. However, this may not always be desired – for example, we may have a choreographed transition sequence where some nested inner elements have a delayed transition or a longer transition duration than the root transition element.
In such cases you can specify an explicit transition duration (in milliseconds) using the duration prop on the <transition> component:
<
transition
:duration
="1000"
>...</
transition
>You can also specify separate values for enter and leave durations:
<
transition
:duration
="{ enter: 500, leave: 800 }"
>...</
transition
>JavaScript Hooks
You can also define JavaScript hooks in attributes:
<
transition
v-on:before-enter
="beforeEnter"
v-on:enter
="enter"
v-on:after-enter
="afterEnter"
v-on:enter-cancelled
="enterCancelled"
v-on:before-leave
="beforeLeave"
v-on:leave
="leave"
v-on:after-leave
="afterLeave"
v-on:leave-cancelled
="leaveCancelled"
>
</
transition
>
methods
: {
beforeEnter
: function
(el
) {
},
enter
: function
(el, done
) {
done()
},
afterEnter
: function
(el
) {
},
enterCancelled
: function
(el
) {
},
beforeLeave
: function
(el
) {
},
leave
: function
(el, done
) {
done()
},
afterLeave
: function
(el
) {
},
leaveCancelled
: function
(el
) {
}
}These hooks can be used in combination with CSS transitions/animations or on their own.
When using JavaScript-only transitions, the done callbacks are required for the enter and leave hooks. Otherwise, the hooks will be called synchronously and the transition will finish immediately.
It’s also a good idea to explicitly add v-bind:css="false" for JavaScript-only transitions so that Vue can skip the CSS detection. This also prevents CSS rules from accidentally interfering with the transition.
Now let’s dive into an example. Here’s a JavaScript transition using Velocity.js:
<
script
src
="https://cdnjs.cloudflare.com/ajax/libs/velocity/1.2.3/velocity.min.js"
></
script
>
<
div
id
="example-4"
>
<
button
@click
="show = !show"
>
Toggle
</
button
>
<
transition
v-on:before-enter
="beforeEnter"
v-on:enter
="enter"
v-on:leave
="leave"
v-bind:css
="false"
>
<
p
v-if
="show"
>
Demo
</
p
>
</
transition
>
</
div
>new
Vue({
el
: '#example-4'
,
data
: {
show
: false
},
methods
: {
beforeEnter
: function
(el
) {
el.style.opacity = 0
el.style.transformOrigin = 'left'
},
enter
: function
(el, done
) {
Velocity(el, { opacity
: 1
, fontSize
: '1.4em'
}, { duration
: 300
})
Velocity(el, { fontSize
: '1em'
}, { complete
: done })
},
leave
: function
(el, done
) {
Velocity(el, { translateX
: '15px'
, rotateZ
: '50deg'
}, { duration
: 600
})
Velocity(el, { rotateZ
: '100deg'
}, { loop
: 2
})
Velocity(el, {
rotateZ
: '45deg'
,
translateY
: '30px'
,
translateX
: '30px'
,
opacity
: 0
}, { complete
: done })
}
}
})Demo
Transitions on Initial Render
If you also want to apply a transition on the initial render of a node, you can add the appear attribute:
<
transition
appear
>
</
transition
>By default, this will use the transitions specified for entering and leaving. If you’d like however, you can also specify custom CSS classes:
<
transition
appear
appear-class
="custom-appear-class"
appear-to-class
="custom-appear-to-class"
(2.1.8
+)
appear-active-class
="custom-appear-active-class"
>
</
transition
>and custom JavaScript hooks:
<
transition
appear
v-on:before-appear
="customBeforeAppearHook"
v-on:appear
="customAppearHook"
v-on:after-appear
="customAfterAppearHook"
v-on:appear-cancelled
="customAppearCancelledHook"
>
</
transition
>In the example above, either appear attribute or v-on:appear hook will cause an appear transition.
Transitioning Between Elements
We discuss transitioning between components later, but you can also transition between raw elements using v-if/v-else. One of the most common two-element transitions is between a list container and a message describing an empty list:
<
transition
>
<
table
v-if
="items.length > 0"
>
</
table
>
<
p
v-else
>Sorry, no items found.</
p
>
</
transition
>This works well, but there’s one caveat to be aware of:
When toggling between elements that have the same tag name, you must tell Vue that they are distinct elements by giving them unique key attributes. Otherwise, Vue’s compiler will only replace the content of the element for efficiency. Even when technically unnecessary though, it’s considered good practice to always key multiple items within a <transition> component.
For example:
<
transition
>
<
button
v-if
="isEditing"
key
="save"
>
Save
</
button
>
<
button
v-else
key
="edit"
>
Edit
</
button
>
</
transition
>In these cases, you can also use the key attribute to transition between different states of the same element. Instead of using v-if and v-else, the above example could be rewritten as:
<
transition
>
<
button
v-bind:key
="isEditing"
>
{{ isEditing ? 'Save' : 'Edit' }}
</
button
>
</
transition
>It’s actually possible to transition between any number of elements, either by using multiple v-ifs or binding a single element to a dynamic property. For example:
<
transition
>
<
button
v-if
="docState === 'saved'"
key
="saved"
>
Edit
</
button
>
<
button
v-if
="docState === 'edited'"
key
="edited"
>
Save
</
button
>
<
button
v-if
="docState === 'editing'"
key
="editing"
>
Cancel
</
button
>
</
transition
>Which could also be written as:
<
transition
>
<
button
v-bind:key
="docState"
>
{{ buttonMessage }}
</
button
>
</
transition
>
computed
: {
buttonMessage
: function
() {
switch
(this
.docState) {
case
'saved'
: return
'Edit'
case
'edited'
: return
'Save'
case
'editing'
: return
'Cancel'
}
}
}Transition Modes
There’s still one problem though. Try clicking the button below:
As it’s transitioning between the “on” button and the “off” button, both buttons are rendered – one transitioning out while the other transitions in. This is the default behavior of <transition> – entering and leaving happens simultaneously.
Sometimes this works great, like when transitioning items are absolutely positioned on top of each other:
And then maybe also translated so that they look like slide transitions:
Simultaneous entering and leaving transitions aren’t always desirable though, so Vue offers some alternative transition modes:
-
in-out: New element transitions in first, then when complete, the current element transitions out. -
out-in: Current element transitions out first, then when complete, the new element transitions in.
Now let’s update the transition for our on/off buttons with out-in:
<
transition
name
="fade"
mode
="out-in"
>
</
transition
>
With one attribute addition, we’ve fixed that original transition without having to add any special styling.
The in-out mode isn’t used as often, but can sometimes be useful for a slightly different transition effect. Let’s try combining it with the slide-fade transition we worked on earlier:
Pretty cool, right?
Transitioning Between Components
Transitioning between components is even simpler – we don’t even need the key attribute. Instead, we wrap a dynamic component:
<
transition
name
="component-fade"
mode
="out-in"
>
<
component
v-bind:is
="view"
></
component
>
</
transition
>new
Vue({
el
: '#transition-components-demo'
,
data
: {
view
: 'v-a'
},
components
: {
'v-a'
: {
template
: '<div>Component A</div>'
},
'v-b'
: {
template
: '<div>Component B</div>'
}
}
}).component-fade-enter-active
, .component-fade-leave-active
{
transition
: opacity .3s
ease;
}
.component-fade-enter
, .component-fade-leave-to
{
opacity
: 0
;
}
A
B
List Transitions
So far, we’ve managed transitions for:
- Individual nodes
- Multiple nodes where only 1 is rendered at a time
So what about for when we have a whole list of items we want to render simultaneously, for example with v-for? In this case, we’ll use the <transition-group> component. Before we dive into an example though, there are a few things that are important to know about this component:
- Unlike
<transition>, it renders an actual element: a<span>by default. You can change the element that’s rendered with thetagattribute. - Transition modes are not available, because we are no longer alternating between mutually exclusive elements.
- Elements inside are always required to have a unique
keyattribute. - CSS transition classes will be applied to inner elements and not to the group/container itself.
List Entering/Leaving Transitions
Now let’s dive into an example, transitioning entering and leaving using the same CSS classes we’ve used previously:
<
div
id
="list-demo"
>
<
button
v-on:click
="add"
>Add</
button
>
<
button
v-on:click
="remove"
>Remove</
button
>
<
transition-group
name
="list"
tag
="p"
>
<
span
v-for
="item in items"
v-bind:key
="item"
class
="list-item"
>
{{ item }}
</
span
>
</
transition-group
>
</
div
>new
Vue({
el
: '#list-demo'
,
data
: {
items
: [1
,2
,3
,4
,5
,6
,7
,8
,9
],
nextNum
: 10
},
methods
: {
randomIndex
: function
() {
return
Math
.floor(Math
.random() * this
.items.length)
},
add
: function
() {
this
.items.splice(this
.randomIndex(), 0
, this
.nextNum++)
},
remove
: function
() {
this
.items.splice(this
.randomIndex(), 1
)
},
}
}).list-item
{
display
: inline-block;
margin-right
: 10px
;
}
.list-enter-active
, .list-leave-active
{
transition
: all 1s
;
}
.list-enter
, .list-leave-to
{
opacity
: 0
;
transform
: translateY
(30px
);
}
{{ item }}
There’s one problem with this example. When you add or remove an item, the ones around it instantly snap into their new place instead of smoothly transitioning. We’ll fix that later.
List Move Transitions
The <transition-group> component has another trick up its sleeve. It can not only animate entering and leaving, but also changes in position. The only new concept you need to know to use this feature is the addition of the v-move class, which is added when items are changing positions. Like the other classes, its prefix will match the value of a provided name attribute and you can also manually specify a class with the move-class attribute.
This class is mostly useful for specifying the transition timing and easing curve, as you’ll see below:
<
script
src
="https://cdnjs.cloudflare.com/ajax/libs/lodash.js/4.14.1/lodash.min.js"
></
script
>
<
div
id
="flip-list-demo"
class
="demo"
>
<
button
v-on:click
="shuffle"
>Shuffle</
button
>
<
transition-group
name
="flip-list"
tag
="ul"
>
<
li
v-for
="item in items"
v-bind:key
="item"
>
{{ item }}
</
li
>
</
transition-group
>
</
div
>new
Vue({
el
: '#flip-list-demo'
,
data
: {
items
: [1
,2
,3
,4
,5
,6
,7
,8
,9
]
},
methods
: {
shuffle
: function
() {
this
.items = _.shuffle(this
.items)
}
}
}).flip-list-move
{
transition
: transform 1s
;
}
This might seem like magic, but under the hood, Vue is using an animation technique called FLIP to smoothly transition elements from their old position to their new position using transforms.
We can combine this technique with our previous implementation to animate every possible change to our list!
<
script
src
="https://cdnjs.cloudflare.com/ajax/libs/lodash.js/4.14.1/lodash.min.js"
></
script
>
<
div
id
="list-complete-demo"
class
="demo"
>
<
button
v-on:click
="shuffle"
>Shuffle</
button
>
<
button
v-on:click
="add"
>Add</
button
>
<
button
v-on:click
="remove"
>Remove</
button
>
<
transition-group
name
="list-complete"
tag
="p"
>
<
span
v-for
="item in items"
v-bind:key
="item"
class
="list-complete-item"
>
{{ item }}
</
span
>
</
transition-group
>
</
div
>new
Vue({
el
: '#list-complete-demo'
,
data
: {
items
: [1
,2
,3
,4
,5
,6
,7
,8
,9
],
nextNum
: 10
},
methods
: {
randomIndex
: function
() {
return
Math
.floor(Math
.random() * this
.items.length)
},
add
: function
() {
this
.items.splice(this
.randomIndex(), 0
, this
.nextNum++)
},
remove
: function
() {
this
.items.splice(this
.randomIndex(), 1
)
},
shuffle
: function
() {
this
.items = _.shuffle(this
.items)
}
}
}).list-complete-item
{
transition
: all 1s
;
display
: inline-block;
margin-right
: 10px
;
}
.list-complete-enter
, .list-complete-leave-to
{
opacity
: 0
;
transform
: translateY
(30px
);
}
.list-complete-leave-active
{
position
: absolute;
}
{{ item }}
One important note is that these FLIP transitions do not work with elements set to display: inline. As an alternative, you can use display: inline-block or place elements in a flex context.
These FLIP animations are also not limited to a single axis. Items in a multidimensional grid can be transitioned too:
Lazy Sudoku
Keep hitting the shuffle button until you win.
{{ cell.number }}
Staggering List Transitions
By communicating with JavaScript transitions through data attributes, it’s also possible to stagger transitions in a list:
<
script
src
="https://cdnjs.cloudflare.com/ajax/libs/velocity/1.2.3/velocity.min.js"
></
script
>
<
div
id
="staggered-list-demo"
>
<
input
v-model
="query"
>
<
transition-group
name
="staggered-fade"
tag
="ul"
v-bind:css
="false"
v-on:before-enter
="beforeEnter"
v-on:enter
="enter"
v-on:leave
="leave"
>
<
li
v-for
="(item, index) in computedList"
v-bind:key
="item.msg"
v-bind:data-index
="index"
>{{ item.msg }}</
li
>
</
transition-group
>
</
div
>new
Vue({
el
: '#staggered-list-demo'
,
data
: {
query
: ''
,
list
: [
{ msg
: 'Bruce Lee'
},
{ msg
: 'Jackie Chan'
},
{ msg
: 'Chuck Norris'
},
{ msg
: 'Jet Li'
},
{ msg
: 'Kung Fury'
}
]
},
computed
: {
computedList
: function
() {
var
vm = this
return
this
.list.filter(function
(item
) {
return
item.msg.toLowerCase().indexOf(vm.query.toLowerCase()) !== -1
})
}
},
methods
: {
beforeEnter
: function
(el
) {
el.style.opacity = 0
el.style.height = 0
},
enter
: function
(el, done
) {
var
delay = el.dataset.index * 150
setTimeout(function
() {
Velocity(
el,
{ opacity
: 1
, height
: '1.6em'
},
{ complete
: done }
)
}, delay)
},
leave
: function
(el, done
) {
var
delay = el.dataset.index * 150
setTimeout(function
() {
Velocity(
el,
{ opacity
: 0
, height
: 0
},
{ complete
: done }
)
}, delay)
}
}
})
Reusable Transitions
Transitions can be reused through Vue’s component system. To create a reusable transition, all you have to do is place a <transition> or <transition-group> component at the root, then pass any children into the transition component.
Here’s an example using a template component:
Vue.component('my-special-transition'
, {
template
: '\
<transition\
name="very-special-transition"\
mode="out-in"\
v-on:before-enter="beforeEnter"\
v-on:after-enter="afterEnter"\
>\
<slot></slot>\
</transition>\
'
,
methods
: {
beforeEnter
: function
(el
) {
},
afterEnter
: function
(el
) {
}
}
})And functional components are especially well-suited to this task:
Vue.component('my-special-transition'
, {
functional
: true
,
render
: function
(createElement, context
) {
var
data = {
props
: {
name
: 'very-special-transition'
,
mode
: 'out-in'
},
on
: {
beforeEnter
: function
(el
) {
},
afterEnter
: function
(el
) {
}
}
}
return
createElement('transition'
, data, context.children)
}
})Dynamic Transitions
Yes, even transitions in Vue are data-driven! The most basic example of a dynamic transition binds the name attribute to a dynamic property.
<
transition
v-bind:name
="transitionName"
>
</
transition
>This can be useful when you’ve defined CSS transitions/animations using Vue’s transition class conventions and want to switch between them.
Really though, any transition attribute can be dynamically bound. And it’s not only attributes. Since event hooks are methods, they have access to any data in the context. That means depending on the state of your component, your JavaScript transitions can behave differently.
<
script
src
="https://cdnjs.cloudflare.com/ajax/libs/velocity/1.2.3/velocity.min.js"
></
script
>
<
div
id
="dynamic-fade-demo"
class
="demo"
>
Fade In: <
input
type
="range"
v-model
="fadeInDuration"
min
="0"
v-bind:max
="maxFadeDuration"
>
Fade Out: <
input
type
="range"
v-model
="fadeOutDuration"
min
="0"
v-bind:max
="maxFadeDuration"
>
<
transition
v-bind:css
="false"
v-on:before-enter
="beforeEnter"
v-on:enter
="enter"
v-on:leave
="leave"
>
<
p
v-if
="show"
>hello</
p
>
</
transition
>
<
button
v-if
="stop"
v-on:click
="stop = false; show = false"
>Start animating</
button
>
<
button
v-else
v-on:click
="stop = true"
>Stop it!</
button
>
</
div
>new
Vue({
el
: '#dynamic-fade-demo'
,
data
: {
show
: true
,
fadeInDuration
: 1000
,
fadeOutDuration
: 1000
,
maxFadeDuration
: 1500
,
stop
: true
},
mounted
: function
() {
this
.show = false
},
methods
: {
beforeEnter
: function
(el
) {
el.style.opacity = 0
},
enter
: function
(el, done
) {
var
vm = this
Velocity(el,
{ opacity
: 1
},
{
duration
: this
.fadeInDuration,
complete
: function
() {
done()
if
(!vm.stop) vm.show = false
}
}
)
},
leave
: function
(el, done
) {
var
vm = this
Velocity(el,
{ opacity
: 0
},
{
duration
: this
.fadeOutDuration,
complete
: function
() {
done()
vm.show = true
}
}
)
}
}
})Fade Out:
hello
Fade In:Fade Out:
Finally, the ultimate way of creating dynamic transitions is through components that accept props to change the nature of the transition(s) to be used. It may sound cheesy, but the only limit really is your imagination.
[NEW] 2021 Leave Tracker & Vacation Tracker Excel Template | leave v2 – NATAVIGUIDES
The Leave Tracker Excel template enables leave/vacation tracking in an organized way, calculates employee attendance, presents a calendar view of leave across multiple employees and also prints an annual employee report.
Whether you are a HR Manager, a Small Business Owner or a Project Manager who is responsible for tracking leave/vacation/time-off taken by employees, you will find this simple and effective leave/vacation tracker template useful.
Here is a sample of Leave Tracker dashboard you can create instantly using this Excel Template.
![]() Employee Leave Tracker Dashboard for All Employees tracking vacations
Employee Leave Tracker Dashboard for All Employees tracking vacations
Features of Employee Leave Tracker Excel Template
The following are the highlights of the template.
- Customize settings to meet your business needs
- Track 5 types of employee leave (For up to 12 leave types, try Employee Leave Manager template)
- Customize which days are weekends (not working days)
- Account company holidays
- Practical Features
- Track vacation for multiple employees
- Employees can have start dates and termination dates
- Can handle partial days of leave
- Ease of Use
- Easy to enter Leave in ranges of dates (example: 4 days of leave from Nov 21st to Nov 24th)
- Easy to customize colors to suit your preferences
- Can use the template continuously for many years (keep all your data organized in one file :))
- Automated Calculations
- Fully Automated Vacation Tracker Dashboard with monthly calendar view
- Calculates Worked Days automatically
- Automated Annual Employee attendance report
Downloads
Video Demo
How to use the Leave Tracker Excel Template
The template has 5 visible sheets. (Settings, Employees, Leave, Team Dashboard, Employee Report).
Here is the overview of steps to use the template.
- Enter Leave Types, Select Weekends and Enter Holidays in the Settings sheet
- Enter list of employees in Employees sheet
- Enter leave data for employees in Leave sheet
- Choose a month and view vacation calendar for the team in Team Dashboard sheet
- Choose an employee and view/print annual employee attendance report in Employee Report sheet
Detailed Steps
Now, let’s see the steps in more detail.
Before we begin, if you are new to Excel tables, please read Introduction to Excel Tables for data entry. Data entry in all our templates use Excel tables and a quick introduction to that will get you going in the correct direction.
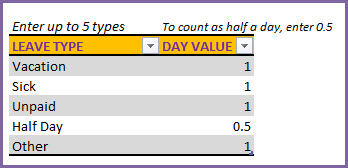
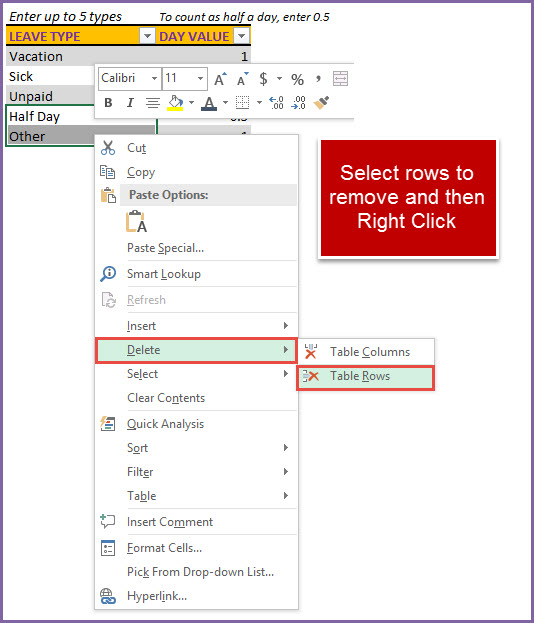
Step 1: Enter up to 5 types of leave to suit your company
The template by default supports 5 types of categorizing your leave. Since different companies may have different names and different number of leave types, the template supports customizing them.
 Enter 5 types of Employee Leave types to suit your business
By default, you will see the leave types (Vacation, Sick, Unpaid, Half Day, Other). You can just type over these names and replace with your own preferred names.
How to handle half-day leaves
You can see that there is an option to assign ‘Day Value’ to each leave type. This setting is present to handle partial days of leave. For example, I have entered 0.5 for ‘Half Day’ leave type. That means that when an employee takes Half Day leave, template will add 0.5 to leave taken total and reduces the Worked days by 0.5.
If your company allows 2 hours leave in an 8 hour workday setup, that would be 0.25 day. You can create a leave type and enter 0.25 as ‘Day Value’.
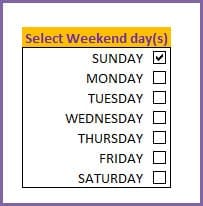
Step 2: Select your company Weekends
In order to calculate attendance of employees automatically, we need to know company weekends so that we can remove them from working days.
I learnt from our readers that weekend days can vary a lot by country. Though Saturday/Sunday is the most common weekend choice, there are so many countries that use a different work week and weekend setup. (Wikipedia article on Weekends)
 Select Company Weekends to use for employee attendance tracking
Since our goal is to provide a global solution to vacation tracking, we have the option of selecting any combination of weekend days. In the screenshot above, I have chosen Sunday as Weekend.
So, this tells the template to do 3 things.
- Template will highlight Sundays visually differently on the vacation dashboard
- While calculating attendance, it will not include the Sundays as Working days.
- Sundays will also not get counted as leave. When an employees takes Thursday to Monday as Vacation, it will count only as 4 days of leave (Thu, Fri, Sat, Mon).
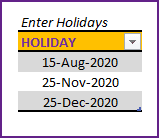
Step 3: Enter company holidays
Enter list of holidays in your company.
 Enter company holidays
The template will treat the holidays similar to Weekends for calculation purposes, but holidays will be displayed in a different color on the calendar. This allows us to view holidays and weekends distinctly.
Step 4: Enter Employees’ data
Now, we move to the Employees sheet.
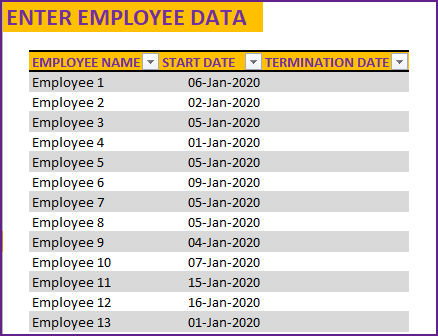 Enter Employee Name, Start Date and Termination Date (optional)
We will enter the Employee Name, Start Date (date when the employee began employment) and then Termination Date (if applicable). The Start Date and Termination Date allow the template to calculate the count of working days for each employee correctly.
Since the template can help you manage leave for multiple employees for long term windows (even many years, as there is no limit 🙂 ), it is quite possible that new employees join the company and current employees may leave. I want the template to work smoothly for you even when that happens.
Step 5: Enter Employee Leave Data
Now, for the last data entry section, we move to the Leave sheet.
We enter leave taken by each employee here. There are four fields (Employee Name, Leave Start Date, Leave End Date and Leave Type) in this table.
Enter Employee Leave Data – Employee Name, Leave Start Date, Leave End Date and Leave Type
If an employee takes a 5 day vacation, you can enter that in one row by providing Leave Start and Leave End dates.
If an employee takes a single day leave, please enter same date in Start Date and End Date fields.
Leave Type field has data validation built-in which shows the 5 options we set in the Settings sheet.
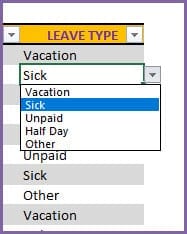 Leave Type – Drop down options for data entry
Similarly the Employee Name also has data validation to allow only employee names available in the Employees sheet. But the drop down option will not activate until a new row is created in the table. If you like typing in the name directly, you can go ahead. If you prefer the drop down options, please read further below in the ‘Extensions’ section where I discuss a work-around .
We are done with data entry. It’s time to see the template’ magic in creating the vacation calendar and report.
Step 6: View Team’s Monthly Leave Dashboard
The dashboard is interactive as it allows the user to choose the month for which we want to view the leave data for. We will enter the month by selecting Year and Month.
![]() Choose Month for Vacation Tracker Dashboard
Choose Month for Vacation Tracker Dashboard
There are two pages in this Dashboard sheet. First is the leave calendar view.
Leave Tracker Dashboard – showing calendar for all employees
As you can see from the above screenshot, the leave types are shown in different color. The legend is shown at the top indicating what each color means. In addition to the 5 leave types, we also have display for the following: Holidays (purple), Weekends (Dark Gray), Not Employed (Dot pattern) and Not Applicable (Diagonal Line pattern).
Order of priority for colors: Not Applicable > Not Employed > Holidays > Weekends > leave types
Holidays and Weekends are self-explanatory. Not Employed will represent the days before the employee began employment and days after the employee termination date (if applicable).
Not Applicable represents the days that are not actual dates. For example, if you choose November month, 31st day will be Not applicable. For February in a non-leap year, 29, 30, 31 will be Not Applicable days.
You can use this calendar view to assess if you will have enough coverage in your team for specific weeks (for example, during the holiday season).
Monthly Summary
This sheet also shows the monthly summarized count of days taken off under each leave type, total leave taken and Worked Days.
![]() Leave Tracker Dashboard in Excel showing monthly summary of leave days and worked days
Leave Tracker Dashboard in Excel showing monthly summary of leave days and worked days
Total Leave is the sum of leave taken under each of the 5 leave types.
If an employee’s leave overlaps with a holiday or a weekend, it does not count as a leave day.
Worked Days is calculated as (Company Working days – Holidays – Weekends – Not Employed Days – Total Leave days)
Worked days represents the number of days an employee worked or is scheduled to work.
You can look at this view during the last week of a month, to calculate the next month’s capacity (in work days) for the entire team. This will be helpful to evaluate whether you have enough capacity to meet the demand (work) ahead in the next month.
Step 7: View Annual Employee Attendance Report
While the previous sheet was about viewing all employees at once in a calendar view one month at a time, we also need to see one employee’s data across months. This is where the Employee Report comes in handy.
Here we have three inputs.
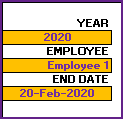 Select year, Employee name and End date for the Annual employee report
The Year and Employee Name selections should be easily understandable.
End Date is set to Today’s date by default. This allows the report to show attendance/leave data as of today.
You can change this End Date by manually typing in any date, if you want to create a report as of any specific date (a month end, for example).
This sheet has 2 pages as well. First, the calendar view.
Employee Attendance – Leave Report showing types of leave, holidays and weekends
As we discussed with the Team Dashboard, the colors and the legend work the same way. For the chosen employee and year, we can visualize the complete year’s leave patterns.
The second page presents the summarized count of leave and worked days.
Employee Attendance Report – Monthly Summary of leave by type and worked days
Recommended Template
EMPLOYEE LEAVE MANAGER
For managing leave for up to 12 leave types & tracking balances
-

Employee Leave Manager Excel Template
Sale
Product on sale
$
50
$
40
Rated 5.00 out of 5 based on
customer ratings
Extensions
How to extend the functionality of the template?
What if I don’t need 5 leave types
No problem. You can just remove additional leave types easily.
In this example, I have selected last 2 rows of the Leave Type table. Then, right click to bring up the menu that you see in the image below.
 How to remove leave types if not needed
Click on Delete –> Table Rows.
This will remove the two rows and you will be left with 3 leave types to track for your company. That’s how easy it is. 🙂
How to enable drop down values for Employee Name in the Leave Table?
First, we will extend the table to additional empty rows. Click on the end of the table and drag down.
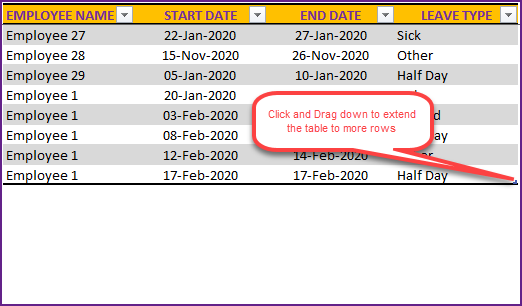 Click on the end of table and drag down to extend table to more rows
Once you do that, the table will look like below, with new empty rows.
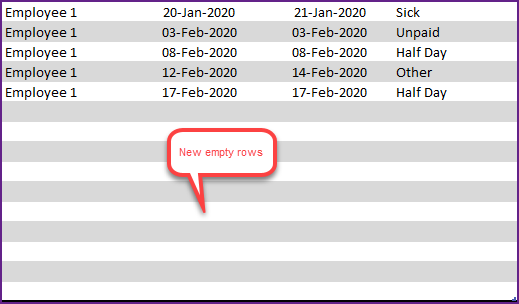 New Empty rows in Leave Table
Now that you have new rows inside the table, the drop downs for both Employee Name and Leave Type will work.
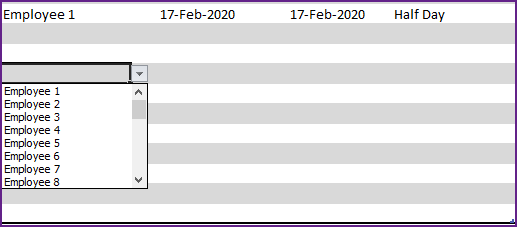 Drop down for Employee name works
It is recommended that you add only a few empty rows at a time. The more rows we have, Excel has to process more data when it is performing calculations needed for our dashboard and employee report. This could slow Excel down.
Can I remove employees from the file?
On occasions, you may want to remove an employee’s name from the file if he/she has left the team.
- Select the employee’s name in the Employees’ sheet
- Right Click and Choose Delete —> Table Rows
You can also remove the employee’s leave data from the Leave sheet, but that is optional.
How can I share this file with my team?
- Print
- Press Ctrl+P or select Print from the File menu.
- Both Team Dashboard and Employee Report are set up ready for printing
- Export to PDF
- From the File menu, select Export and click on ‘Create PDF/XPS‘
- Select the location to store the PDF file on your computer
- Provide a name to the PDF file and click Publish.
- You can then email the PDF to your team members or post in your local shared drive.
I don’t like the colors. How can I change them?
Colors are personal preferences. Sometimes, you may want to use your company’s color palette in the documents. Not a problem. Let me explain how you can change the colors used in the template.
As an example, I will show how to change the Holidays color.
Open the Conditional Formatting menu from Home ribbon.
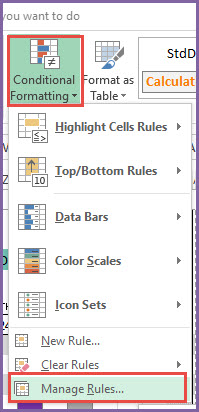 Open Conditional Formatting menu from Home Ribbon
Select ‘This Worksheet’ to show formatting rules used in the current sheet.
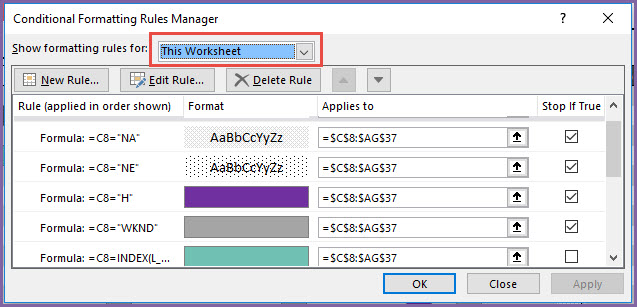 Select ‘This Worksheet’ to see conditional formatting rules used in the sheet
At the top, you will see the rules used to highlight Not Employed, Not Applicable, Weekends and Holidays.
Let’s select the Holiday rule (the purple one) and then click on ‘Edit Rule’.
 Select a rule and then click on ‘Edit Rule’
In the next window, click on Format to choose the new formatting.
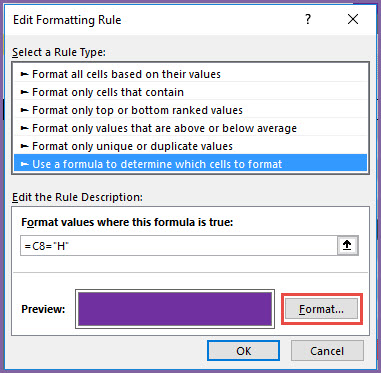 Click on Format to change formatting
Now, you can see the option to choose a color.
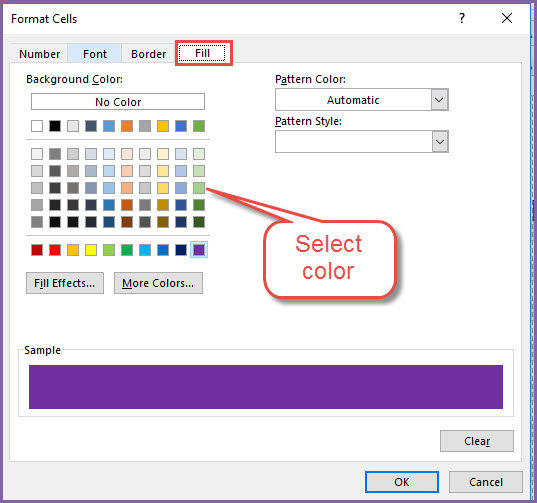 Select Color of your preference and click OK
Select the color you prefer and click OK. You will need to click OK in the next couple of dialog boxes as well. Now, you should see the holidays represented in a different color.
You can then save the file (Ctrl+S) to save your changes.
In the conditional formatting rules, when you scroll down, you will see the colors used for the 5 leave types.
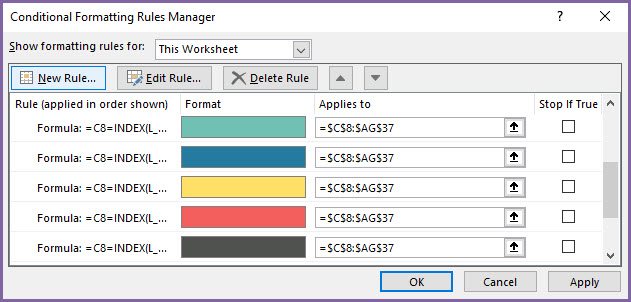 Conditional Formatting rules for the 5 leave types
Click on those rules and change colors if needed. The procedure is the same as we did for the Holidays.
How can I edit the formulas? The sheets are protected.
You can unprotect the sheets using indzara as password.
If you are new to this, please read this article on unprotecting/unlocking sheets.
What if I have more than 30 employees?
You can enter more than 30 employees in the Employees sheet. There is no limit imposed here. However, the Team Dashboard shows only 30 employees. To extend that, follow these steps. To support 35 employees,
- Unprotect the Team Dashboard sheet with the password
- Select cells B36:AO36 (this is the row of Employee 29)
- Drag down for 6 rows as to fill them with the formulas.
Now you should see 35 (29+6) employees accounted for. If you need to extend for more employees, follow the same steps but increase the number of rows you are copying.
If you print or export to PDF, adjust print settings accordingly to include these new additional employees.
How to add calculations such as Attendance %?
You can unprotect the Team Dashboard sheet and add calculations if needed.
For example, if you need to calculate employee’s attendance %, you can follow these steps.
- In cell AP8, type =AO8/(AN8+AO8)
- This calculates Attendance % as Worked/(Leave+Worked)
- Then, select cell AP8 and drag down to fill the cells AP9 to AP37.
This will add a column of Attendance % to the Dashboard.
This was just an example. You can add any other calculations as needed for your company’s needs.
How to create Leave Tracker in Excel
A fully self-paced video course explaining each step in building this template is available.
![]() Course – Vacation and Attendance Tracker Dashboard
Course – Vacation and Attendance Tracker Dashboard
I hope this template is useful. If you like it, please share it with your friends. If you have any suggestions or questions around tracking vacation in Excel, please leave them in the comments section. I will continue to enhance this template based on feedback.
Related Free Excel Templates
All Devil Fruit Damage and Showcase On A 25Mil Player [Update 16] – Blox Fruits Update 16 [Roblox]
RoadTo100KSubs
Be sure to subscribe and leave a like!
Join my Roblox Group/Buy My Merch: https://www.roblox.com/groups/9283897/OfficialJCWKGroup!/store
Donate to me Robux if you want! : https://www.roblox.com/games/516922890/JCWKsDonationPlace!/store
Join my Discord Server: https://discord.gg/EZZsz8TzwC
Guy who made this thumbnail: https://www.youtube.com/c/ChronoPlays1481
นอกจากการดูบทความนี้แล้ว คุณยังสามารถดูข้อมูลที่เป็นประโยชน์อื่นๆ อีกมากมายที่เราให้ไว้ที่นี่: ดูเพิ่มเติม
![All Devil Fruit Damage and Showcase On A 25Mil Player [Update 16] - Blox Fruits Update 16 [Roblox]](https://i.ytimg.com/vi/Xwpcxk3NKFI/maxresdefault.jpg)
gnash – leave (at home music video) 💕
download/stream: https://gnash.lnk.to/leaveID
lyrics:
(intro) one time
\u0026 i’m ready to go
two times
\u0026 i’m driving u home
it’s all my fault
if it makes things better
blame it all
on the change in the weather
(v1) got my head in my hands
\u0026 my heart in the clouds
\u0026 the worst part of me
is walking out the door
there’s a knife in my chest
but i’m trying my best
is it me or was it u
i’m not so sure
(hook) one time
\u0026 i’m ready to go
two times
\u0026 i’m driving u home
it’s all my fault
if it makes things better
blame it all
on the change in the weather
three times
\u0026 i’m ready to blow up
last time
\u0026 i’ll leave it alone
say, it’s all my fault
if it makes things better
i’ll take the fall
u can wear my sweater
(v2)
i’m not saying i know how to save this
i’m just saying we’ve been here before
u say do the dishes
i admit i’m vicious
now there’s broken dishes on the floor
(hook)
(bridge) i lost my patience made an ultimatum
wrote it down gave it on a piece of paper
pinned it up on the refrigerator
piece of mind or peace \u0026 see u later
i’ve been up \u0026 down a couple days
tryna cope with going separate ways
i put all of that shit aside
it took looking u in the eyes, to see
i don’t want u to leave
(hook)
\r
connect with gnash: \r
http://instagram.com/gnash\r
http://twitter.com/gnash\r
http://fb.com/gnashgnashgnash\r
http://soundcloud.com/gnash\r
http://gnash.us\r
\r
Subscribe for more official content from gnash: https://gnash.lnk.to/YTSubscribe\r
\r
The official YouTube channel of Atlantic Records artist gnash. Subscribe for the latest music videos, performances, and more.\r
\r
gnash leave athome stayhome homevideo leaveathome

THE PERFECT PRE? EL JEFE LIMITED EDITION V2 REVIEW | ASC SUPPLEMENTS
THE REVIEW BROS PRE WORKOUT IS HERE 🤯 ⬇️ 10% DISCOUNT CODE: RB10
https://hugesupplements.com/products/extremelimitededition
—————————————————————
💡 ⬇️ Featured ⬇️ 💡
—————————————————————
https://www.fitcookie.co.uk/
https://instagram.com/fitcookieuk?utm_medium=copy_link
UK based vitamin / supplement store that sells a wide range of unique and tasty products 🍪
—————————————————————
https://www.hugesupplements.com
https://instagram.com/hugesupplements?igshid=bu3b3tf5qfm3
Premium, high quality supplement company that stocks epic products such as Wrecked, Pump Serum and Hibernate (CODE: RB10 for 10% off everything on site)
—————————————————————
https://www.10xathletic.com
https://instagram.com/10xathleticusa?utm_medium=copy_link
A UK based supplement company that stocks extremely well dosed, well rounded products. Highly recommended by us. (CODE: RB10 for 10% off everything on site)
—————————————————————
https://www.smartsupps.co.uk
https://instagram.com/smartsupps_?utm_medium=copy_link
A UK based supplement retailer 📦💥 🏢
(CODE: RB10 for 10% off everything on site)
—————————————————————
https://jnxsports.com
https://instagram.com/jnxsports?igshid=1fgm45ntk1u2t
A US based supplement company that stocks some awesome and well known pre workouts and fat burners such as The Curse, The Shadow and The Ripper!
—————————————————————
https://peakperformancelabs.ca
https://instagram.com/peakperformancelabs?igshid=1mi3dtk0rdfcq
Canadian supplement company that produces top tier premium products such as Nuclear Pump, Nuclear Pre and Nuclear Power ☢️ (CODE: reviewbros10 for 10% off everything on site)
—————————————————————
https://thepreworkoutcompany.com
https://www.facebook.com/thepreworkoutcompany/
https://instagram.com/thepreworkoutcompany?igshid=1aotzko7mudaa
A UK based supplement retailer 📦💥 🏢
(CODE: RB5 for 5% off everything on site)
—————————————————————
https://www.discountsupplements.co.uk
https://instagram.com/discount_supplements?igshid=kcjnpsfv4rz2
A UK based supplement retailer 📦💥 🏢 (CODE: RB5 for 5% off everything on site)
—————————————————————
JOIN OUR GROWING MEMBERSHIP BASE \u0026 BECOME PART OF THE RB ARMY ‼️💥
▫️PREWORKOUT SAMPLE PACKS!
▫️ONE DAY EARLY ACCESS TO OUR REVIEW VIDEOS AND DISCOUNT CODES TO LIMITED STOCK
▫️ENTRY INTO ALL FUTURE GIVEAWAYS ON ALL OF OUR SOCIAL MEDIA PLATFORMS
▫️BADGES NEXT TO YOUR YOUTUBE NAME
▫️BE PART OF OUR EXCLUSIVE SUPPLEMENT GROUP CHAT
▫️SUPPORT OUR CHANNEL SO WE CAN CONTINUE TO DO WHAT WE DO 🙏🏻
⤵️⤵️⤵️⤵️JOIN LINK⤵️⤵️⤵️⤵️
https://www.youtube.com/channel/UCyo1EdfmU5jwS7YzNLIvddA/
—————————————————————
🟢🔴🟢🔴🟢🔴🟢🔴🟢🔴🟢🔴🟢🔴
www.ascsupplements.com
Today we review EL JEFE LIMITED EDITION V2 BY ASC SUPPLEMENTS and give you our honest thoughts on everything about the product Taste, Mixability, Label, Effects and summarise it with our Final Verict❗️
➖
Please leave us a thumbs up on the video as it helps us grow, and please do subscribe if you are new here today 🙏🏼 we hope you enjoy all of our reviews, new and old❗️
➖
See some of our popular review links below!
➖
Wrecked https://youtu.be/GRoTNrNo2Fk
Dark Energy https://youtu.be/nX86k9rkMk
Assassin 6 https://youtu.be/pYPprY4k
Crack https://youtu.be/W0wK26_Fs6w
1’3 Volt https://youtu.be/quDkMoEpR3o
Excelsior https://youtu.be/Mh5GYjDRHDc
Zeus https://youtu.be/XyrgQnLFrAk
Jack3d https://youtu.be/yr48_ojIOK8
Stim Head https://youtu.be/z5wv3HNwWlI
Superhuman Supreme https://youtu.be/XPq3056fXdw
MVPre 2.0 https://youtu.be/YBo2wa9Dxik
Pre Phase KO https://youtu.be/P_VGSOIVVQ
Nuclear Pre https://youtu.be/kc6flYwT6YE
➕ SO SO SO MANY MORE (Youtube search: review bros type pre workout name)
➖
AS ALWAYS… STAY STIMMED‼️⚠️💯

SLANDER – Love Is Gone ft. Dylan Matthew (Acoustic) – Lyrics
Anyone listen to music on spotify?
I created Sad Songs Playlist :
https://open.spotify.com/playlist/2iEAMCE5j5PF7sWxoJQoyV
Fanpage : https://www.facebook.com/RachelGardnerMusic/
Follow SLANDER
http://instagram.com/slanderofficial
http://facebook.com/slanderofficial
http://twitter.com/slanderofficial
http://Snapchat: slanderofficial
http://slanderofficial.com/tour
Follow Dylan Matthew
https://www.instagram.com/itsdylanmat…
https://www.facebook.com/itsdylanmatt…
https://twitter.com/itsdylanmatthew
https://www.dylanmatthew.com/
Contact me :
Facebook: https://www.facebook.com/RachelGardnerMusic
Email: [email protected]
Background: https://unsplash.com/photos/9_xwRMFL1BM
Lyrics
Don’t go tonight
Stay here one more time
Remind me what it’s like…
And let’s fall in love, one more time
I need you now, by my side
It tears me up, when you turn me down
I’m begging please, just stick around
I’m sorry, don’t leave me, I want you here with me
I know that your love is gone
I can’t breathe, I’m so weak, I know this isn’t easy
Don’t tell me that your love is gone
That your love is gone
Don’t tell me that your love is gone, that your love is gone.
I’m sorry, don’t leave me, I want you here with me
I know that, your love is gone
I can’t breathe, I’m so weak, I know this isn’t easy…
Don’t tell me that your love is gone.
That your love is gone.
That your love is gone.
I can’t breathe, I’m so weak, I know this isn’t easy.
Don’t tell me that your love is gone.
That your love is gone.
LoveIsGone SLANDER DylanMatthew

[Dream’s Manhunt Megalovania] Leave me alone V2 | Manhunt AU Phase 1 OST
Thanks for watching!
Music : JacksonAnimates
His Channel : https://www.youtube.com/channel/UC9z2sb0vOcjID6NJdHSvCw
Phase 2 V2 is coming out soon!
Video made with FLStudio ZGameEditor Visualizer plugin\r\rEffect author credits: \r\”Linear\”, author: StevenM,OBV10U3_NINJA,Youlean
![[Dream's Manhunt Megalovania] Leave me alone V2 | Manhunt AU Phase 1 OST](https://i.ytimg.com/vi/zdnEU7AXSmg/maxresdefault.jpg)
นอกจากการดูบทความนี้แล้ว คุณยังสามารถดูข้อมูลที่เป็นประโยชน์อื่นๆ อีกมากมายที่เราให้ไว้ที่นี่: ดูวิธีอื่นๆLEARN FOREIGN LANGUAGE
ขอบคุณที่รับชมกระทู้ครับ leave v2