command แปลว่า: นี่คือโพสต์ที่เกี่ยวข้องกับหัวข้อนี้
*** บทนี้จะต่อจากบล๊อกที่แล้ว compiler – ตอนที่ 4.1 Grammar ไวยากรณ์ภาษา ทำยังไงให้คอมมันรู้ว่าประโยคที่พิมพ์แปลว่าอะไร นะ จะพูดถึง EBNF กับ RegExp โดยไม่ทวนแล้วนะ … ถ้าใครยังไม่ได้อ่านกลับไปอ่านก่อน ไม่งั้นไม่รู้เรื่องแน่
ในขั้นตอนนี้เราจะมากำหนด Rule ของภาษากันว่า programming language ตัวใหม่ที่เรากำลังจะสร้างขึ้นมาน่ะจะให้เขียนยังไงได้บ้าง
ตัวอย่างเช่น

ถ้า รูปแบบภาษาของเรากำหนดว่าเขียนประมาณนี้ เป็นภาษาโปรแกรมแบบง่ายๆ ที่มีส่วนสำหรับประกาศตัวแปรอยู่ข้างบน แล้วเขียนคำสั่งว่าจะทำอะไรอยู่ข้างล่างประมาณนี้
(ถ้าใครรู้จักภาษาปาสคาลน่าจะคุ้นๆ กับ syntax แบบนี้อยู่นะ)
ถ้า แบ่งแบบคร่าวๆ ก็มีอยู่ 2 ส่วนหลักๆ ที่เห็นชัดๆ เลยคือส่วน “Declaration” (ส่วนประกาศตัวแปร) กับส่วน “Command” (คำสั่งว่าจะให้ทำอะไรยังไง)
ย้ำอีกครั้งว่าตัวอย่างที่ภาษาที่เรากำลังจะสร้างขึ้นมาใหม่เนี่ยเป็นภาษาแบบง่ายๆ นะ
แต่ถ้าดูในเรื่องของรายละเอียดแค่นั้นมันยังไม่พอ … เราต้องแบ่งให้มันชัดเจนกว่านี้ อย่างเช่น
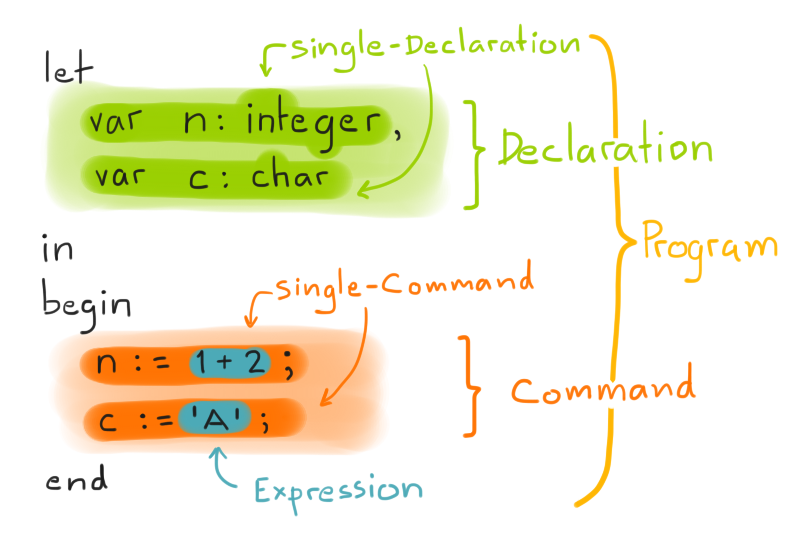
Table of Contents
Syntax Rule กฎการเขียนที่เรากำหนดเองได้
หรือก็คือการสร้าง Grammar ให้กับภาษาที่เราสร้างอ่ะนะซึ่งถ้าใครเขียนโปรแกรมเป็นคงพอจะจำได้ว่าเรามักจะเจอพวก
int x; int y; int z; <--
แบบนี้คือโค้ดสร้างตัวแปรใหม่ (declare)x = 5; y = min(100,200); <--
แบบนี้คือโค้ดคำสั่ง (command)(4+7) * 8 / 2 * 10 <--
แบบนี้ึคือพวกสมการ คิดเลขๆ (expression)
โอเค! เข้าเรื่องดีกว่า พูดวนไปวนมานานและ (ฮา) … อย่างแรกสุดเลยเราจะเขียนกฎ grammar ขึ้นมาว่า
Rule 1 : Program

กฎแรกสุดคือต้องบอกว่า Program ประกอบขึ้นมาจากอะไรได้บ้าง (โดยใช้การเขียนแบบ EBNF นั่นแหละนะ)
ก็คือต้อง ขึ้นด้วย let แล้วตามด้วยส่วนของการ declaration ในระหว่างนี้จะคั่นด้วยตำว่า in begin ก่อนจะเป็นส่วนเนื้อหาของคำสั่ง command แล้วจบด้วย end
สังเกต ดูนะว่าเราจะใช้วิธีประกาศแบบคร่าวๆ ซะก่อน เพราะโค้ดส่วน declaration กับ command นั่นน่ะมันใหญ่มาก เดี๋ยวค่อยลงรายละเอียดอีกทีว่าในส่วนต่างๆ พวกนั้นน่ะมันเขียนยังไงได้บ้าง

Rule 2 : Declaration
ใน ส่วนของการ Declaration เรากำหนดว่ามันจะประกอบขึ้นมาจาก
- single-declaration หรือจะไม่มีเลยก็ได้ (เพราะมี RegExp [ ? ] ต่ออยู่ – แปล 0 หรือ 1 ตัวอ่ะนะ)
- ถ้ามีหลายตัวจะต้องเขียนคั่นด้วย “,” (เพราะมี RegExp [ * ] ครอบไว้ – แปลว่าจะมีกี่ตัวก็ได้)
งั้นก็ต้องไปดูต่ออีกว่า single-command แต่ละตัวนี่มันเขียนยังไงกัน (ซอยเป็นชิ้นเล็กๆ ย่อยมาก เพื่อการแบ่งส่วนที่ชัดเจน)
ในส่วนการประกาศตัวแปร (แบบตัวเดี่ยวๆ หรือ single-declaration) นี่เราต้องรู้จักกับ “Identifier” ซะก่อน
Identifier
idenฯ เป็นเหมือนกับตัวแทนชื่อของอะไรสักอย่าง (อะไรก็ได้เลย) ที่มันไม่ตรงกับคำที่ใช้เป็น keyword ในภาษาของเรา เช่นก่อนหน้านี้เราใช้ let in begin end อะไรพวกนี้ไปแล้ว ทีนี้ถ้าเราจะประกาศตัวแปรชื่อ “n” หรือแม้แต่บอกว่ามันเป็น “integer” อะไรแบบนี้
คือมันเป็นคำที่ตั้งขึ้นมาเองน่ะ เราจะจัดเจ้าพวกนี้อยู่ในกลุ่มของ ไอเดนติฟายเออ~ร์!
Rule 3 : Single-Declaration
เอาล่ะ กลับมาที่ single-command อีกครั้ง … มันก็ประกอบขึ้นมาจาก var เป็นคำเริ่มตามด้วย idenฯ 2 ตัว ตัวแรกเป็น “ชื่อตัวแปร” และตามด้วย “type” (คั่นด้วย “:”)
Rule 4 : Command
แล้วเราก็มาถึง Command ตัวนี้จะไม่อิบายอะไรเยอนะเพราะมันเหมือนกับ Declaration เลย แต่มีการใช้กฎที่ไม่เหมือนกันมากเท่าไหร่ คือ…
- อย่างน้อยต้องมี sigle-command 1 ตัวนะ (ครั้งนี้ไม่มี RegExp [ ? ] มาให้แล้ว)
- ถ้าจะมี single-command หลายตัวก็ย่อมได้! (RegExp เป็น [ * ]) แต่ต้องคั่นพวกมันด้วย “;” นะ
Rule 5 : Single-Command
ตัวนี้แหนะซับซ้อน! บอกเลย!
single-command คือคำสั่งย่อยๆ ที่เราเขียนได้ทั้งหมดในโปรแกรมนี้ ึำถามคือปกติเราเขียนโปรแกรมเราเจอคำสั่งอะไรบ้างล่ะ?
- คำสั่งเซ็ตค่า เช่น x = 10
- คำสั่งเรียกใช้ฟังก์ชั่น เช่น print(“เฮลโหล๋~โลกกก”)
- คำสั่งเลือกว่าจะทำอะไร คือ if-else อ่ะแหละ เช่น if x > 1 then print(“เอ็กซ์มากกว่า1นะ”) end
- คำสั่ง loop เช่น while i<100 then i++ end
ราวๆ นั้นล่ะนะ…

ใน เมื่อ command มันเป็นได้หลายแบบ เราเลยต้องเขียนมันให้ครบทุกแบบอ่ะนะ (บอกว่าเขียนได้หลายแบบโดยใช้ RegExp [ | ] คือ “หรือ” นะ เป็นตัวไหนก็ได้ )
เอาตัวอย่างแค่นี้ละกัน ใน Rule 5 เรามี Expression อยู่ก็แปลว่าเราจะต้องไปเขียน Rule ของ Expression ต่ออีกที ทำแบบนี้ไปเรื่อยๆ
ลองมาดูของจริงๆ กันบ้างดีกว่าว่า Syntax Rule หรือ Grammar นี่มันเยอะขนาดไหนกัน
ตัวอย่าง Rule ของภาษา “Nartra”
ไหนๆ ก็ไหนๆ และ … ขอถือโอกาสสร้างภาษาโปรแกรมใหม่ของตัวเองเลยละกัน (ฮา) โดยภาษานี้ชื่อว่า “Nartra” ละกัน หึหึ
ซึ่งกฎการเขียนภาษา nartra ก็มีดังนี้ (ไม่เหมือนตัวอย่างที่ยกไปอธิบายตอนต้นนะ)
1. Nartra ::=
start
Name : Dclns Functions Body 2. Dclns ::=let
(
Dcln ;)
+
3. Dcln ::=Name
(
, Name)
*
: Type 4. Type ::= Integer|
Char|
Bool 5. Functions ::= Function*
6. Function ::=func
Name ( Params ) : Dclns Body 7. Params ::=(
Dcln(
; Dcln)
*)
?
8. Body ::=begin
Command(
; Command)
*
end
9. Command ::= Name := Expression | Name += Expression | Name ++ | Name ((
Expression(
, Expression)
*
)
?
) |(
, Expression)
*
)
?
) |if
Expressionthen
Command(
else
Command)
?
end
|do
Commandwhile
Expressionend
|while
Expressionthen
Commandend
|
for
Name := Expressionto
Expressionthen
Commandend
10. Expression ::= Term <= Term | Term >= Term | Term != Term | Term < Term | Term > Term | Term == Term | ( Expression ) ? Term : Term | Term 11. Term ::= Term + Factor | Term - Factor | Term * Factor | Term / Factor | Term % Factor | Factor 12. Factor ::= Primary & Factor | Primary | Factor | Primary 13. Primary ::= - Primary | + Primary | integer'char'
| Name | ( Expression ) 14. Name ::= Identifier
มาดูคำอธิบายแต่ละส่วนกัน
เนื่องจากเวลาเราเขียน Rule เราเริ่มจากตัวที่ใหญ่สุดก่อน แล้วค่อนเขียนตัวย่อยๆ ลงมาเรื่อยๆ จนหมด –> ดังนั้นถ้าอธิบายตัวใหญ่สุดก่อนคงจะงงงว่าแต่ละตัวนี่มันอะไรกันเนี่ย! เลยจะขออธิบายจากตัวเล็กสุดก่อนละกัน (อธิบายจาก rule ข้อ 14 กลับขึ้นไปถึงข้อ 1 ละกัน)
14. Name
ข้อนี้เป็นกฎที่บอกว่า [Name] จะสร้างขึ้นมาจาก Identifier คือชื่ออะไรก็ได้บลาๆๆ ซึ่งการตั้งชื่อพวกนี้จะใช้กฎ lexical rule (ไว้เราค่อยมาพูดถึงมันในบทต่อๆ ไปละกัน)
ตัวอย่าง
x
y
i
num
count
13. Primary
ข้อนี้กำหนดกฎของส่วนที่เรียกว่า [Primary] ซึ่งบอกว่ามันอาจจะมีสัญลักษณ์เช่น “-” หรือ “+” นำหน้าได้ นอกจากนี้ยังเป็นตัวอักษร ตัวเลขก็ยังได้
ตัวอย่าง
100
-100
'A'
num
12. Factor
เป็นตัว bit operator ในภาษานี้ เอาไว้ทำ AND OR ในระดับบิต
ตัวอย่าง
100 & 200
11. Term
เป็นระดับกลุ่มค่าที่สามารถเอามา บวก ลบ คูณ หาร ม๊อด กันได้แล้ว
ตัวอย่าง
1 + 2
10 * 20 / 40
10. Expression
ระดับนี้เป็นระดับที่เราพอจะเริ่มเห็นภาพแล้วว่ามัน คืออะไร ถ้า Term คือการเอาตัวเลข+ตัวแปรมาผสมกันเป็น “สมการ” แล้วละก็ … expression ก็คือรูปแบบ “สมการที่มีการเปรียบเที่ยบเพิ่มเข้ามา” นั่นแหละนะ
ตัวอย่าง
-10 + x * ( 20 - y ) >= r * count + 1
โดยที่ -10 + x * ( 20 - y ) >= r * count + 1
- ทั้งหมดเนี่ยถือว่าเป็น
Expression
(ถือไม่มีการเรียกใช้ >= มีแค่สมการอย่างเดียวก็ยังนับเป็น Expressionได้นะ)
- ดังนั้นในเคสนี้ สมการ 2 ข้างจะนับว่าประกอบมาจาก
Term
- ตัวอย่างนี้ไม่มี Factor ข้ามไปเป็น
Primary
เลย
- ส่วนพวกตัวแปรก็จะเป็น
Name
ไปนะ
9. Command
ส่วนนี้บางทีจะเรียกว่า “Statement” หรือเรียกง่ายๆ คือคำสั่ง (ย่อยๆ อ่ะนะ) เอาไว้บอกว่าโปรแกรมเราจะต้องทำอะไรยังไงบ้าง
ซึ่งส่วนใหญ่แล้ว command มันจะประกอบขึ้นมาจาก command ย่อยและ expression ละนะ
สำหรับภาษา Nartra นี้ได้กำหมดไว้ว่าคำสั่งทั้งหมดมีแบบนี้
- Assign Command – เอาไว้เซ็ตค่าตัวแปร เช่น
x := 10
- Increment by – เอาไว้เพิ่มค่าให้ตัวแปรตามที่เรากำหนด เช่น
x += 10 (อารมณ์คล้ายๆ ภาษา C, Java พวกนั้นเลย)
- Increment one – เพิ่มค่าให้ตัวแปรอีก 1 เช่น
x++
- Call Function – เรียกใช้ฟังก์ชั่น เช่น
random() min(
10, x
)ใน Rule ตัวนี้ลองสังเกตนะ ว่ามันมี RegExp ผสมอยู่ด้วยซึ่งเป็น [ ? ] หมายความว่าเราสามารถส่ง “parameter” เข้าไปได้ด้วยล่ะ (กี่ตัวก็ได้เพราะเป็น [ * ] )
- output – คำสั่งสำหรับแสดงผล ความจริงตอนแรกกะว่าจะถือเป็น Function ตัวหนึ่งแบบข้อที่แล้ว แต่อยากแสดงตัวอย่างให้ดูว่าเราจะกำหนด Rule ลงไปเลยก็ยังได้นะว่ามันสามารถเรียกแบบนี้ได้
print
( x, 10, 'A' ) - If (Condition) – คำสั่ง if นั่นแหละ เขียนแบบ
if
x > 0then
x := 1end
ซึ่งเราอนุญาตว่าอาจจะมี else เข้ามาผสมด้วยก็ได้นะ (เป็น RegExp [ ? ] )
- Loop 3 ตัวคือ do..while, while, for เช่น
do
i++while
i<100end
while
i<100then
i++end
for
i := 1to
100then
print( i )end
8. Body
เป็นส่วนเนื้อหาหลักของโปรแกรมเรา คล้ายๆ กับที่อธิบายไปข้างต้นโน่นแล้ว มันก็มี command หลายๆ ตัวอยู่นั่นแหละ
ตัวอย่าง
begin
x := 1 ;
if i > 10 then  y := x + 10 else y := 20 end
z := min(x, y) ;
print( z )
end
7. Params
พารามิเตอร์นี่มันจะใช้คู่กับเวลาประกาศ Function ล่ะ ซึ่งมันจะประกอบมาจาก Dcln (Declaration) ถ้านึกไม่ออกว่าทำไมมันต้องเป็นส่วนประกาศค่าลองดูโค้ดนี่ในภาษาอื่น
// C / Java
void my_function(
int a, char b
) {...}// PHP / JavaScript
function my_function(
$a, $b
) {...}
ใช่มั้ยล่ะ! ภาษาอื่นถ้าจะเขียนรับพารามิเตอร์ก็ต้องรับแบประกาศตัวแปรเลย งั้นภาษาเราก็ทำบ้าง (ฮา)
อ้อ เรื่องรูปแบบ Rule ที่เป็น RegExp ไม่อธิบายแล้วนะ มันเหมือนเดิมอ่ะ
6. Function
ส่วนนี้เอาไว้ประกาศฟังก์ชั่นที่เราสร้างเอง
ตัวอย่าง
func
my_function ( a : Integer ; b : char) :begin
print( a, b )end
รูป แบบการสร้างฟังก์ชั่นก็คือมีชื่อที่เรากำหมดเองได้ รับพารามิเตอร์มา แล้วจะทำอะไรต่อก็เขียนใน begin … end นั่นแหละนะ ง่ายๆ ตรงๆ เลย
5. Functions
อันนี้ไม่มีอะไรเลย เข้าใจง่าย Functions ก็คือ Function หลายๆ ตัวนั่นแหละ (หรือไม่มีเลยก็ได้) เพราะปกติแล้วในการเขียนโปรแกรม เราไม่ได้สร้างฟังก์ชั่นได้แค่ตัวเดียว มันสร้างหลายๆ ตัวได้
4. Type
คือชนิดตัวแปร ซึ่งภาษานี้มีให้เลือกแค่ 3 ตัวคือ Integer, Char, Bool แค่นั้นแหละ เราจะเอาไปใช้ร่วมกับ Dcln (การประกาศตัวแปรต้องบอกว่ามันเป็น type อะไรไง)
3. Dcln
ส่วนการประกาศตัวแปรเอามาใช้ในโปรแกรม เช่นถ้าเป็นภาษา Java เราจะใช้แบบ int a; int x, y, z;
แต่ภาษา Nartra จะใช้แบบนี้
x : Integer
x , y , z : Integer
2. Dclns
เช่นเคย การประกาศตัวแปรในโปรแกรม มันไม่ได้ประกาศกันตัวเดียว บางทีมันก็มีหลายตัว ดังนั้นเราก็เลยต้องมี Dcln หลายตัวกลายเป็น Dclns ไงล่ะ
1. Nartra
สุดท้ายของท้ายที่สุด หลังจากเรารู้จัดทุกส่วนประกอบของภาษาโปรแกรมเราเลย ก็ต้องบอกว่า Rule ของโปรแกรมเราจะเริ่มและจบด้วยการเขียนแบบนี้ๆๆ นะ
ตัวอย่างแบบเต็ม คือเอาทุกส่วนมาใช้เลย
start MyFirstProgram :
 let
 x , y , z : Integer ;
 c , r , : Char ;

func my_func( a , b : Integer ; x : Bool ) :
let
 i : Integer;
begin
for i := a to b then
 print( i )
end
end

begin
 x := 1 ;
 y := 100 ;
 if x < y then
 my_func( x , y , 1 )
 end
end
เรื่อง Grammar ของภาษาก็ขอจบไว้แค่นี้ละกัน ในบทต่อไปเราจะมาดูกันต่อว่าหลังจากเรากำหมด Grammar เสร็จเรียบร้อยจะทำยังไงละ โปรแกรมคอมไพเลอร์ถึงจะอ่านโค้ดเราออก
คำตอบก็คือใช้สิ่งที่เรียกว่า “Parser” เป็นตัวอ่าน … แล้วเจอกันบทต่อไป ^__^
581 Total Views
3 Views Today
[NEW] Usability คืออะไร? | command แปลว่า – NATAVIGUIDES
Share:
+1
อยากออกแบบ Product ให้ User-friendly อาจต้องเข้าใจความหมายของคำว่า Usability ก่อน แล้วเค้าเอาเกณฑ์ไหนมาวัดว่า Product ของเราตอนนี้ “ใช้ง่ายหรือยาก” – Usability เป็นอีกหนึ่งอภิธานศัพท์ (UX Terminology) ที่ UX/UI Designer ควรรู้
Usability คืออะไร?
“Usability” เป็นตัวบ่งชี้คุณภาพ (quality attribute) ของ Product ว่าใช้งานได้ง่ายแค่ไหน “ความยากง่าย” ส่งผลโดยตรงกับความรู้สึกและการตัดสินใจของ User ว่าจะใช้งาน Product นี้ต่อไปหรือไม่
ISO 9241-11 ให้คำนิยามของ Usability อย่างเป็นทางการว่า:
The official definition of usability is: “the extent to which a product can be used by specified users to achieve specified goals with effectiveness, efficiency and satisfaction in a specified context of use.”
ISO 9241-11
ถ้าเอาคำนิยามของ Usability ตาม ISO มากางออกเป็นสมการจะได้ว่า

Usability = Effectiveness (ใช้ได้) ∩ Efficiency (ใช้ง่าย) ∩ Satisfaction (ชอบใช้)
ในกระบวนการสร้างซอฟต์แวร์ เราอาจจะเคยเจอเหตุการณ์หลายอย่างที่เราได้อย่างเสียอย่าง เช่น
- Product ใช้งานได้ตรงตาม Requirement ทุกอย่าง แต่ User ต้องอ่านคู่มือก่อนถึงจะใช้ได้ > ไม่มี Effectiveness
- User กรอกข้อมูลได้ แต่ต้องกรอกทีละ record ไม่มีฟังก์ชั่น import .CSV file > ไม่มี Efficiency
- คุยกับ Siri ได้ แต่ Siri ไม่เข้าใจที่คุณพูด > ไม่มี Efficiency
- Product ใช้งานได้ง่าย แต่ดีไซน์ สีไม่ถูกใจ > ไม่มี Satisfication
การสร้าง Product ที่มี Usability ที่ดีจำเป็นต้องมีคุณภาพทั้ง 3 อย่างนี้รวมกัน ถ้าขาดอย่างใดอย่างนึงก็จะทำให้คุณภาพการใช้งานลดลง
Usability ที่ดี มีองค์ประกอบอยู่ 5 อย่าง คือ
 องค์ประกอบ 5 อย่างของ Usability (Credit)
- เข้าใจง่าย (Learnability): ตอนใช้ครั้งแรก User สามารถทำ basic task ง่าย ๆ ได้ เช่น App สั่งอาหาร User สามารถใช้ฟังก์ชั่นสั่งอาหารได้เองโดยไม่ต้องอ่าน tutorial – อยาก note ข้อนี้ไว้ว่าบาง App ที่มี Tutorial ไม่ได้แปลว่า Usability ห่วยเสมอไป > อ่านต่อตรง section Usability ขึ้นอยู่กับบริบท
- ใช้งานไม่ติดขัด (Efficiency): Product ใช้งานได้ลื่นไหล User สามารถทำสิ่งที่อยากทำ สะดวก รวดเร็ว
- คนจำวิธีใช้ได้ (Memorability): User ไม่จำเป็นต้องฝึกใช้ Product ใหม่ถ้าต้องกลับมาใช้อีกรอบ
- มีข้อผิดพลาดน้อย (Errors): Bug น้อย, เจออะไรที่ผิดคาดน้อย, User รู้ว่าจะต้องทำอะไรต่อตอนเจอ Error
- รู้สึกชอบ (Satisfaction): ใช้แล้วรู้สึกดี ดีไซน์ถูกใจ ใช่ เอาตังไปเลย
Usability ต่างจาก User-friendly ยังไง?
UX, User-friendly, Useful, Usability เป็นคำที่เอามาใช้ปนกันบ่อย ๆ 4 คำนี้มีความหมายบางอย่างใกล้เคียงกันแต่ก็เอาใช้แทนกันไม่ได้
Usability ≠ User Experience (UX)
จากรูป UX Umbrella ด้านล่างจะเห็นว่า Usability เป็นหน่วยที่เล็กกว่าและเป็นส่วนหนึ่งของ UX
Usability เป็็นส่วนหนึ่งของ User Experience (รูป UX umbrella ของ Dan Willis)
Usability ดีไม่ได้หมายความว่า UX ทั้งหมดจะดีด้วย เพราะยังมีด้านอื่น ๆ นอกเหนือจาก Usability อย่าง Visual Design, IA, IxD, User Research และ Content Strategy ที่เป็นองค์ประกอบอื่น ๆ ของ UX ที่เราต้องเข้าไปพัฒนาด้วย
Usability ≠ Useful
Product ที่ใช้งานง่ายไม่จำเป็นต้องเป็น Product ที่ทุกคนอยากใช้ นอกเหนือจากความง่ายแล้ว Product ต้องมีประโยชน์ (Utility) ที่ตอบโจทย์หรือแก้ปัญหาของ User ได้ด้วย
Usability ≠ User-friendly
User-friendly is a term we use to describe anything that is easy to learn how to use. It is also easy to use. In other words, even if it sophisticated, using it is simple and straightforward.
marketbusinessnews
“The term user friendly is often used as a synonym for usable, though it may also refer to accessibility.”
Wikipedia
User-friendly refers to anything that makes it easier for novices to use a computer. Menu-driven programs, for example, are considered more user-friendly than command-driven systems. Graphical user interfaces (GUIs) are also considered user-friendly. Online help systems are another feature of user-friendly programs. Although the term user-friendly represents an important concept, it has been so overused that it has become something of a cliché
webopedia.com
User-friendly เป็นเหมือน Term ที่ใช้เรียกความหมายรวม ๆ ของ UX (โดยเน้นหนักไปในด้านใช้งานง่าย) ที่เอาไว้ใช้สื่อสาร concept กับคนนอก Field อย่างเช่น ฝั่ง Business ให้เข้าใจ UX ง่ายขึ้น ความหมายของคำว่า User-friendly ที่ใช้กันค่อนข้างกำกวม บางครั้งหมายถึงซอฟต์แวร์มีฟีเจอร์ที่คนอยากใช้ บางครั้งหมายถึงความเรียบง่าย บางครั้งแปลว่าใช้งานง่าย บางครั้งหมายถึง Accessibility หน้าที่ของ UX Designer คือการตีความว่า User-friendly หมายถึงคุณลักษณะส่วนไหนของ UX
เนื่องจาก Term ของ User-friendly ค่อนข้างกำกวม และมีความหมายได้มากกว่า Usability เลยเอามาใช้แทนกันตรง ๆ เลยไม่ได้ซะทีเดียว
Usability ขึ้นอยู่กับบริบท (Context of use)
คนชอบอะไรที่เข้าใจง่าย ใช้ง่าย แต่ว่าคำว่า “ง่าย” ของแต่คนหรือแต่ละ Product ไม่เท่ากัน – Usability ไม่ได้แปลว่าใช้ง่ายที่สุดเสมอไป
Product ที่มีจำนวนคลิกเยอะหรือมี step เยอะกว่าไม่ได้แปลว่า Product นั้นมี Usability แย่กว่า ตอนที่เราพิจารณาว่า Product “ใช้ง่ายหรือยาก” นั้น เราจำเป็นต้องคิดถึงบริบทว่าใครเป็นคนใช้งาน (Personas) และเค้ามีเป้าหมาย (Goal) อะไร
App แต่งรูป ไม่ได้มี Usability ดีกว่าโปรแกรม Lightroom
Product แต่ละตัวมี Learning Curve ที่คนยอมรับได้ไม่เท่ากัน – User ที่มีเป้าหมายเล็ก ๆ ไม่จำเป็นต้องใช้โปรแกรมที่มีฟังก์ชั่นซับซ้อน จึงยอมเสียเวลาเรียนรู้วิธีใช้งานน้อย App เล็ก ๆ เลยต้องทำให้เข้าใจง่ายที่สุด (Learning Curve ต่ำ)
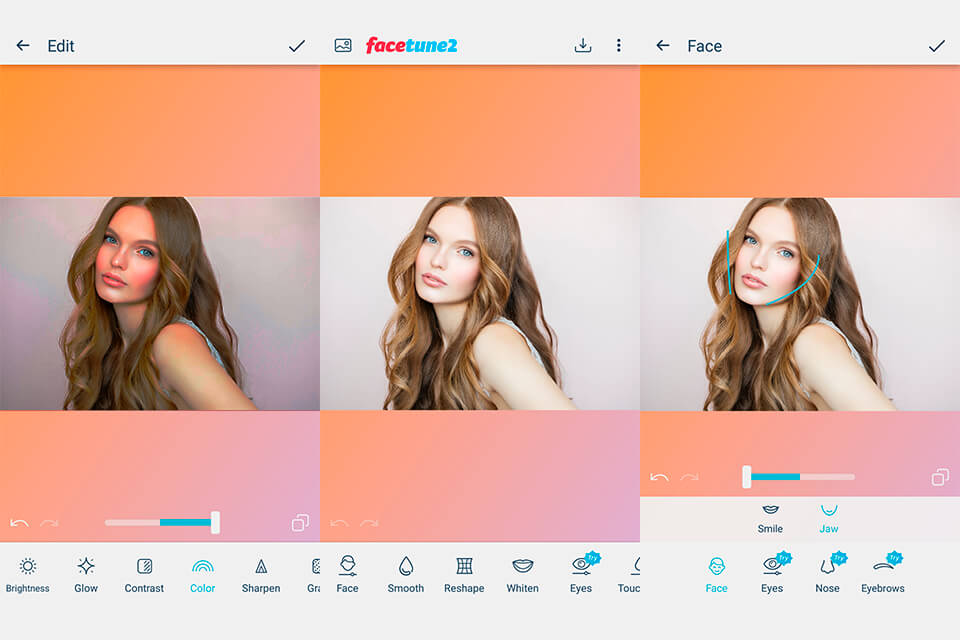 App แต่งรูปถูกทำใช้งานง่ายมาก ๆ เพราะ User เป็นคนทั่วไปที่ไม่ถนัดด้านไอทีและไม่จำเป็นต้องใช้ฟังก์ชั่นซับซ้อน (Credit)
คนที่มีเป้าหมายใหญ่กว่าอาจจะยอมลงทุนเรียนรู้มากหน่อย ซอฟต์แวร์บางตัวจงใจออกแบบให้คนคลิกเยอะขึ้นแลกกับการใช้ฟังก์ชั่นได้ซับซ้อนมากขึ้น โปรแกรมบางอย่างอาจต้องเสียเวลาเรียนเป็นปี ๆ ถึงจะใช้งานได้ แต่ถึงจะเสียเวลามากขึ้นยังไง คนที่ใช้ Lightroom คงไม่ยอมเปลี่ยนไปใช้ App แต่งรูปธรรมดา เพราะ App มันแต่งรูปได้ไม่ละเอียดเท่ากับ Lightroom และการใช้งานที่มีอยู่ตอนนี้ถือว่าง่ายสำหรับ Pro User แล้ว
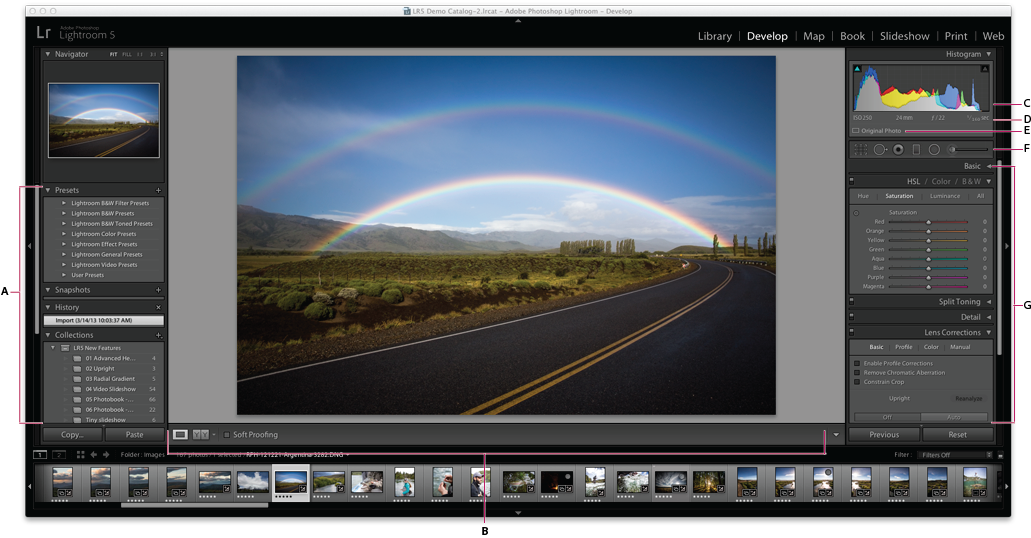 Lightroom เป็น App สำหรับคนที่แต่งรูปแบบจริงจัง (professional) User จำเป็นต้องอ่านคู่มือก่อน หรือดูวิดิโอ Tutorial ถึงจะใช้งานได้ แลกกับประสิทธิการใช้งานที่สูงขึ้น
จากตัวอย่างด้านบน จะเห็นว่า คำว่า “ง่าย” ของแต่คนหรือแต่ละ Product ไม่เท่ากัน โปรแกรม Light Room มีฟังก์ชั่นที่ทำงานได้เยอะกว่า App แต่งรูปธรรมดา แต่ต้องแลกมากับ Learning Curve ที่สูงขึ้น การพัฒนา Usabilty เลยจำเป็นต้องคิดถึง Trade-off ตรงนี้ด้วย
ซอฟต์แวร์ทุกตัวไม่ได้ทำมาให้คนทั่วไปใช้อย่างเดียว User มีสกิลหลายระดับ และแต่ละคนมีความต้องการไม่เท่ากัน ด้วยโจทย์จาก User และเงื่อนไขทาง Business ทำให้หลาย ๆ ครั้งเราไม่สามารถออกแบบให้ซอฟต์แวร์ใช้งานง่ายที่สุดได้ มันเลยต้องมีการหาจุดสมดุลของ “ความยากง่าย” กับ User ที่เรามีอยู่ตอนนี้ผ่านกระบวนการที่เรียกว่า “Usability Testing” เพื่อทดสอบว่า Usabilty ตอนนี้เหมาะสมกับ Product ของเรารึยัง
วัด Product ว่า “ใช้ง่ายหรือยาก” ด้วย Usability Testing
การวัดว่า Product ว่า “ใช้ง่ายหรือยาก” ไม่ควรมาจากความคิดเห็นของคนในทีมพัฒนา หรือเจ้าของซอฟต์แวร์ เพราะว่า “เราไม่ใช่ User” การเอาความคิดเห็นของทีมมาตัดสินว่า Product ใช้ง่ายหรือยากจะทำให้เกิด Bias ความคิด ประสบการณ์ สกิลของของเรากับ User ไม่เท่ากัน ทีมพัฒนาที่ทำงานอยู่กับซอฟต์แวร์ตลอดเวลาก็จะคุ้นชินอยู่แล้วว่าโปรเเกรมทำงานยังไง แต่พอลองให้คนที่ไม่คุ้นเคยกับเทคโนโลยีมาใช้ก็อาจจะใช้ไม่ได้ วิธีที่ถูกต้องในการวัดว่า Product ใช้ง่ายหรือยากนั้นคือ ให้เอา Product ไปทดสอบกับ User ตัวจริงของ Product เราเรียกกระบวนการนี้ว่า “Usability Testing”
 ความคิดเห็นของทีมมาตัดสินว่า Product ใช้ง่ายหรือยากจะทำให้เกิด Bias เพราะว่า “เราไม่ใช่ User”
Usability Testing
Concept ของ Usability Testing คือ ให้เราเข้าไปสังเกต และเก็บข้อมูลจาก User ตอนใช้งาน Product แล้วเอาข้อมูลพวกนี้มาปรับปรุงซอฟต์แแวร์ให้ดีขึ้น
การทดสอบ Usability Testing มีหลายวิธี มีทั้งแบบได้ผลที่เป็นตัวเลข หรือแบบที่ได้ข้อมูลเชิงคุณภาพ เช่น ปัญหาต่าง ๆ ที่ User เจอระหว่างการใช้งาน “User testing” เป็นวิธีหนึ่งที่ UX Designer หลายคนนิยมใช้ ดูตัวอย่างการทำ User testing ได้จากวิดิโอด้านล่าง
ตัวอย่างการทำ Usability Testing โดย Camille Burney
ขั้นตอนการทำ User testing (แบบย่อ):
- เตรียม Prototype สำหรับการทดสอบ
- ลองให้ Representative User 3-5 คน ใช้งาน product ตามโจทย์ที่เรากำหนด เช่น ลองจองเวลาจากเว็บนี้, ลองจ่ายเงิน ฯลฯ
- สังเกตว่า User ทำอะไรสำเร็จบ้าง ติดขัด หรือมีข้อผิดพลาดตรงขั้นตอนไหนบ้าง โดยเราไม่เข้าไปชี้นำหรือตอบคำถาม User ระหว่างการทดสอบ
- เอา Feedback มาแก้ไข ปรับปรุง Prototype แล้วทดสอบซ้ำ
Feedback ที่ได้ระหว่างการทดสอบจะเป็นตัวบอกเราเองว่า Product ของเราใช้งานง่ายแค่ไหน และต้องปรับปรุงอะไรบ้าง
Product หนึ่งตัวสามารถทำ Usabilty ได้หลายรอบ เริ่มได้ตั้งแต่ขั้นตอนออกแบบไปจนถึงตอนที่ซอฟต์แวร์เสร็จแล้ว Usability Testing ยิ่งทดสอบเร็วเท่าไหร่ยิ่งดี การแก้ไขบนดีไซน์ตั้งแต่แรกยังไงก็ง่ายกว่าไปแก้หลังจากซอฟต์แวร์สร้างเสร็จแล้ว
“Usability” เป็นองค์ประกอบหนึ่งของ UX ที่เราควรให้ความสำคัญมาก ๆ ไม่มีใครอยากใช้ Product ที่ใช้งานยาก ยกเว้นแต่ว่า User ไม่มีทางเลือกที่ดีกว่านี้แล้ว
Takeaway
- Usability เป็นคุณสมบัติที่บ่งบอกว่า Product ใช้งานได้ง่ายแค่ไหน ซึ่งเป็นปัจจัยสำคัญที่ User ใช้ตัดสินใจว่าจะใช้งาน Product นี้ต่อไปหรือไม่
- Usability ขึ้นอยู่กับ Context ว่าใครเป็นคนใช้งาน และคนใช้มีเป้าหมายอะไร Usability ไม่ได้แปลว่าใช้ง่ายที่สุดเสมอไป
- เราสามารถวัดระดับความยากง่ายของการใช้งานได้จากการทำ Usability Testing
- References
- https://www.interaction-design.org/literature/topics/usability
- https://www.nngroup.com/articles/usability-101-introduction-to-usability/
ไม่พลาดบทความใหม่ๆ จาก BetterUXUI.com
1. กด Like Facebook page BetterUXUI
Betteruxui by PPIxD
2. สมัครและอ่านบทความทางอีเมล
+1
Share:
10 ปุ่มลัดคีย์บอร์ด
10 ปุ่มลัดสำหรับคีย์บอร์ด
รวบรวมปุ่มลัดที่นิยมใช้กันมากที่สุด เพื่อความสะดวกสบายและรวดเร็วในการใช้งานโปรแกรมต่างๆและคอมพิวเตอร์
นอกจากการดูบทความนี้แล้ว คุณยังสามารถดูข้อมูลที่เป็นประโยชน์อื่นๆ อีกมากมายที่เราให้ไว้ที่นี่: ดูเพิ่มเติม

Cmder เรียนรู้การใช้ command line เบื้องต้น Developer มือใหม่ต้องรู้
โหลดโปรแกรม http://cmder.net/
อ่านบล็อกของผม : https://milerdev.com/
ติดต่องาน : https://www.facebook.com/patiphannn/
ติดตามผมทาง Facebook : https://www.facebook.com/patiphanphengpao
กลุ่มพูดคุย : https://www.facebook.com/groups/patiphanch/
ติดตามผมทาง Twitter : https://twitter.com/ohmiler
ติดตามผมทาง Instagram : https://www.instagram.com/ohmilerr/
โดเมนเนม \u0026 โฮสต์ติ้ง โดย RukHost : https://hostings.rukcom.in.th/aff.php?aff=387
สนับสนุนช่องทาง Patreon : https://www.patreon.com/patiphan Watch live at https://www.twitch.tv/patiphanlive

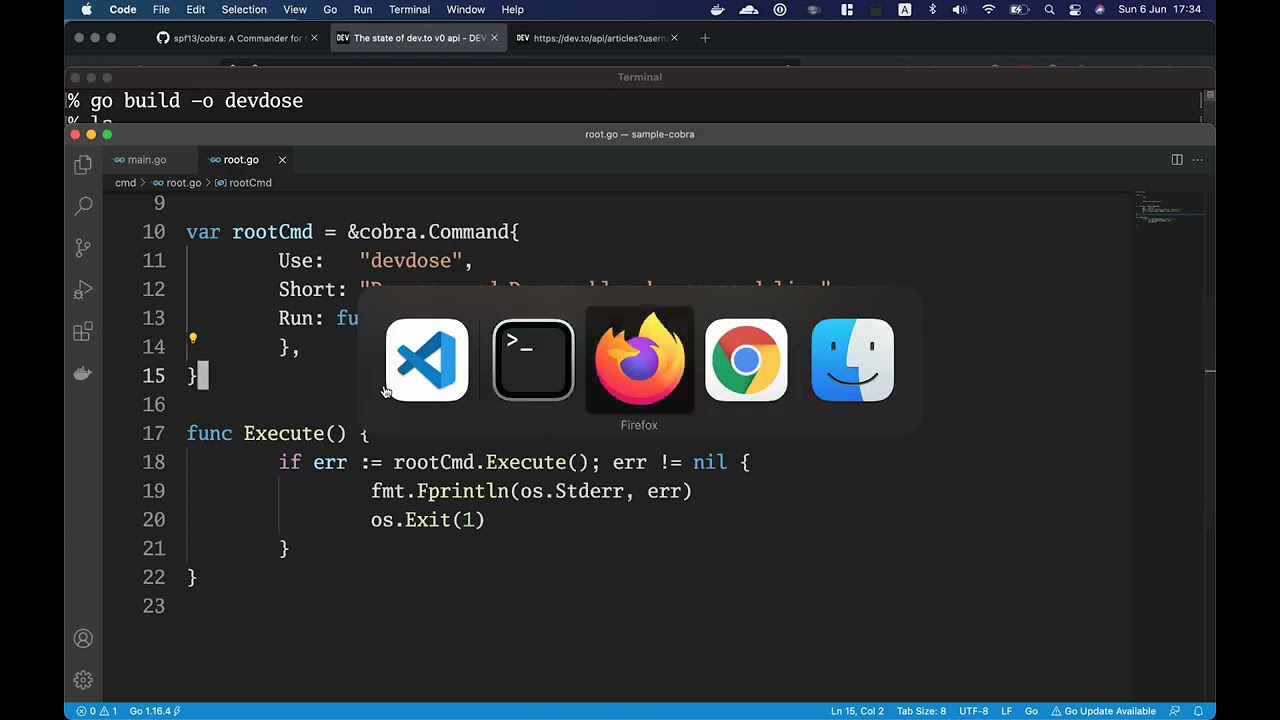
ลอง Go Cobra ทำ command line sub command
ลองเล่น Go Cobra ทำ command line แบบมี sub command เพื่อทำ cli ไปดึง post ของ dev.to มาดู
Angry Birds | Top 10 Hatchlings Cutest Moments
The Hatchlings may just be the cutest of the Angry Birds, sometimes they ooze levels of adorableness that no one should be subjected to. Except you right now that is!
Check out our Top 10 Hatchlings cutest moments!
🌟SUBSCRIBE to Angry Birds Channel and never miss a thing: https://rov.io/subscribe
➡️FOLLOW Angry Birds on:
Facebook: https://www.facebook.com/angrybirds/
Instagram: https://www.instagram.com/angrybirds/
Twitter: https://twitter.com/angrybirds
➡️PLAY all Angry Birds games: https://www.angrybirds.com/games
AngryBirds Hatchlings Adorbs

12 IELTS Speaking Tips
Learn 12 important ways to get a higher score on the IELTS Speaking section. Find out what to do and what NOT to do from an experienced IELTS trainer and understand how to increase your IELTS Speaking score, easily and immediately. You’re guaranteed to learn something new here and that can make all the difference!
http://www.goodluckielts.com/
Take a quiz on this lesson here: http://www.engvid.com/12ieltsspeakingtips/
TRANSCRIPT
Hi. I’m Rebecca from engVid. In today’s lesson, I’ll give you 10 important tips to do well and to get a higher score on the speaking section of your IELTS exam, or actually on any oral speaking test where you’re sitting with a live examiner. Okay? So these tips don’t apply actually to the TOEFL where your answers are recorded, but it’s for any English exam where you’re sitting with a real examiner. Okay?
Now, the IELTS, of course, the speaking section of the IELTS test is about 11 or 14 minutes long, has three different sections, and so on. And the IELTS is an exam which is a… It’s an English proficiency exam. It’s used for immigration purposes, for example, to Canada and Australia. It’s used for admission to universities where English is the medium of instruction, and it’s also used for professional certification purposes. So lots and lots of people, millions of people do the IELTS exam. And if you’re one of them, these speaking tips will really help you. They’re general tips; they’re not about the specific sections. They apply to all sections of the speaking test. Okay? Let’s get started.
So, the first point is: during your speaking test, be formal. By that, I mean treat it like a job interview. And just as in a job interview, you’ll be on your best behaviour and so on, behave that way. Don’t take it very casually. Okay? Take it seriously and be formal.
Next, give a full answer whenever possible. Now, remember and just think about it: you have about 11 to 15 minutes to use the best English that you know and that you’ve studied all your life. Okay? So, obviously, you want to try to show off during your English test. So, when I say give a full answer, I mean, in the first section when they ask you some questions about you, about your family, about your background, if they say, for example: \”Where are you from?\” Don’t just say: \”Tokyo\”, because that’s just a one word answer. Try, as much as possible, to give sentences. Give full sentences. All right? Full answer. So that you can show when you use the full sentence that you know grammar, you know vocabulary, and all these other things. So, instead of just saying: \”Tokyo.\” Say: \”I’m from Tokyo, the capital of Japan.\” Or: \”I’m from the capital of Japan, Tokyo.\” Now, you’ve given a lot more information. So, obviously, you get much more marks if you kept doing that throughout. Right? Give full answers, using sentences, not just words.
Next: be polite. What we mean by that, for example, if the examiner asks you something and you didn’t understand, it’s okay. Just ask for the explanation in a polite way. Don’t just say: \”What?\” Or: \”Sorry?\” Say: \”Excuse me? Could you please repeat that?\” Because that’s also using English, and that’s what they want to know: can you use English? And by being polite, you’re not just showing that you know the language, but also that you know the culture of the language, which is being polite. Okay? So remember to do that.
Next, maintain good posture. Why do I put that? Nobody’s filming you. Right? So, why do you have to maintain good posture? Because your posture actually affects your… The way you speak. It affects your confidence, the confidence with which you speak, it affects the way your voice is projected. So you want to make sure that you don’t, for example, lean on your hand when you’re speaking or anything like that. Okay? Make sure that you sit straight and don’t put your hand anywhere near your face, even if you’re nervous, because that will affect the quality of your voice and the way it’s projected. Okay?
Next. Number five: speak clearly. Now, what I mean by this is: don’t worry too much about your accent. Everyone has an accent, and as long as you do your best to enunciate the words clearly, that’s all you can do. If you need to improve your pronunciation, work on that before your exam. If there are some very specific pronunciation errors that you tend to make or that people from your country tend to make, then obviously, work on those beforehand. For example, if you are a Spanish speaker and you say: \”Jess\”, instead of: \”Yes\”, then that’s a big mistake that you want to correct well before you come to the exam. So, work on those pronunciation issues before, and then afterwards, don’t worry about your accent, just speak as clearly as you can. Okay?

นอกจากการดูบทความนี้แล้ว คุณยังสามารถดูข้อมูลที่เป็นประโยชน์อื่นๆ อีกมากมายที่เราให้ไว้ที่นี่: ดูวิธีอื่นๆLEARN FOREIGN LANGUAGE
ขอบคุณมากสำหรับการดูหัวข้อโพสต์ command แปลว่า