parenthesis คือ: คุณกำลังดูกระทู้
13
Table of Contents
Python parentheses primer
 If you have children, then you probably remember them learning to walk, and then to read. If you’re like me, you were probably amazed by how long it took to do things that we don’t even think about. Things that we take for granted in our day-to-day lives, and which seem so obvious to us, take a long time to master.
You can often see and experience this when you compare how you learn a language as a native speaker, from how you learn as a second language. I grew up speaking English, and never learned all sorts of rules that my non-native-speaking friends learned in school. Similarly, I learned all sorts of rules for Hebrew grammar that my children never learned in school.
It’s thus super easy to take things for granted when you’re an expert. Indeed, that’s almost the definition of an expert — someone who understands a subject so well, that for them things are obvious.
To many developers, and especially Python developers, it’s obvious not only that there are different types of parentheses in Python, but that each type has multiple uses, and do completely different things. But to newcomers, it’s far from obvious when to use round parentheses, square brackets, and/or curly braces.
I’ve thus tried to summarize each of these types of parentheses, when we use them, and where you might get a surprise as a result. If you’re new to Python, then I hope that this will help to give you a clearer picture of what is used when.
I should also note that the large number of parentheses that we use in Python means that using an editor that colorizes both matching and mismatched parentheses can really help. On no small number of occasions, I’ve been able to find bugs quickly thanks to the paren-coloring system in Emacs.
Regular parentheses — ()
Callables (functions and classes)
Perhaps the most obvious use for parentheses in Python is for calling functions and creating new objects. For example:
x = len('abcd')

i = int('12345')
It’s worth considering what happens if you don’t use parentheses. For example, I see the following code all the time in my courses:
d = {'a':1, 'b':2, 'c':3}
for key, value in d.items:
    print(f"{key}: {value}")
When you try to run this code, you can an error message that is true, but whose meaning isn’t completely obvious:
TypeError
: 'builtin_function_or_method' object is not iterable
Huh? What the heck does this mean?
It’s worth remembering how “for” loops work in Python:
- “for” turns to the object at the end of the line, and asks whether it’s iterable
- if so, then “for” asks the object for its next value
- whenever the object says, “no more!” the loop stops
In this case, “for” turns to the method “d.items” and asks if it’s iterable. Note that we’re not asking whether the output from “d.items” is iterable, but rather whether the method itself is iterable.
That’s because there’s a world of difference between “d.items” and “d.items()”. The first returns the method. The second returns an iterable sequence of name-value pairs from the dictionary “d”.
The solution to this non-working code is thus to add parentheses:
d = {'a':1, 'b':2, 'c':3}
for key, value in d.items():
    print(f"{key}: {value}")
Once we do that, we get the desired result.
I should note that we also need to be careful in the other direction: Sometimes, we want to pass a function as an argument, and not execute it. One example is when we’re in the Jupyter notebook (or other interactive Python environment) and ask for help on a function or method:
help(len)

help(str.upper)
In both of the above cases, we don’t want to get help on the output of those functions; rather, we want to get help on the functions themselves.
Prioritizing operations
In elementary school, you probably learned the basic order of arithmetic operations — that first we multiply and divide, and only after do we add and subtract.
Python clearly went to elementary school as well, because it follows this order. For example:
In [1]: 2 + 3 * 4
Out[1]: 14
We can change the priority by using round parentheses:
In [2]: (2 + 3) * 4
Out[2]: 20
Experienced developers often forget that we can use parentheses in this way, as well — but this is, in many ways, the most obvious and natural way for them to be used by new developers.
Creating tuples
Of course, we can also use () to create tuples. For example:
In [8]: t = (10,20,30)

In [9]: type(t)
Out[9]: tuple
What many beginning Python developers don’t know is that you actually don’t need the parentheses to create the tuple:
In [6]: t = 10,20,30

In [7]: type(t)
Out[7]: tuple
Which means that when you return multiple values from a function, you’re actually returning a tuple:
In [3]: def foo():
...: return 10, 20, 30
...:
...:

In [4]: x = foo()

In [5]: x
Out[5]: (10, 20, 30)
What surprises many newcomers to Python is the following:
In [10]: t = (10)

In [11]: type(t)
Out[11]: int
“Wait,” they say, “I used parentheses. Shouldn’t t be a tuple?”
No, t is an integer. When Python’s parser sees something like “t = (10)”, it can’t know that we’re talking about a tuple. Otherwise, it would also have to parse “t = (8+2)” as a tuple, which we clearly don’t want to happen, assuming that we want to use parentheses for prioritizing operations (see above). And so, if you want to define a one-element tuple, you must use a comma:
In [12]: t = (10,)

In [13]: type(t)
Out[13]: tuple
Generator expressions
Finally, we can use round parentheses to create “generators,” using what are known as “generator expressions.” These are a somewhat advanced topic, requiring knowledge of both comprehensions and iterators. But they’re a really useful tool, allowing us to describe a sequence of data without actually creating each element of that sequence until it’s needed.
For example, if I say:
In [17]: g = (one_number * one_number
...: for one_number in range(10))
The above code defines “g” to be a generator, the result of executing our generator expression. “g” is than an iterable, an object that can be placed inside of a “for” loop or a similar context. The fact that it’s a generator means that we can have a potentially infinite sequence of data without actually needing to install an infinite amount of RAM on our computers; so long as we can retrieve items from our iterable one at a time, we’re set.
The above generator “g” doesn’t actually return 10 numbers. Rather, it returns one number at a time. We can retrieve them all at once by wrapping it in a call to “list”:
In [18]: list(g)
Out[18]: [0, 1, 4, 9, 16, 25, 36, 49, 64, 81]
But the whole point of a generator is that you don’t want to do that. Rather, you will get each element, one at a time, and thus reduce memory use.
Something funny happens with round parentheses when they’re used on a generator expression in a function call. Let’s say I want to get a string containing the elements of a list of integers:
In [19]: mylist = [10, 20, 30]

In [20]: '*'.join(mylist)
This fails, because the elements of “mylist” are integers. We can use a generator expression to turn each integer into a string:
In [21]: '*'.join((str(x)
...: for x in mylist))
Out[21]: '10*20*30'
Notice the double parentheses here; the outer ones are for the call to str.join, and the inner ones are for the generator expression. Well, it turns out that we can remove the inner set:
In [22]: '*'.join(str(x)
...: for x in mylist)
Out[22]: '10*20*30'
So the next time you see a call to a function, and a comprehension-looking thing inside of the parentheses, you’ll know that it’s a generator expression, rather than an error.
Cheating Python’s indentation rules
Python is famous for its use of indentation to mark off blocks of code, rather than curly braces, begin/end, or the like. In my experience, using indentation has numerous advantages, but tends to shock people who are new to the language, and who are somewhat offended that the language would dictate how and when to indent code.
There are, however, a few ways to cheat (at least a little) when it comes to these indentation rules. For example, let’s say I have a dictionary representing a person, and I want to know if the letter ‘e’ is in any of the values. I can do something like this:
In [39]: person = {'first':'Reuven', 'last':'Lerner', 'email':'[email protected]'}

In [40]: if 'e' in person['first'] or 'e' in person['last'] or 'e' in person['email']:
...: print("Found it!")
...:
Found it!
That “if” line works, but it’s far too long to be reasonably readable. What I’d love to do is this:
In [40]: if 'e' in person['first'] or
            'e' in person['last'] or
            'e' in person['email']:
...: print("Found it!")
The problem is that the above code won’t work; Python will get to the end of the first “or” and complain that it reached the end of the line (EOL) without a complete statement.
The solution is to use parentheses. That’s because once you’ve opened parentheses, Python is much more forgiving and flexible regarding indentation. For example, I can write:
In [41]: if ('e' in person['first'] or
...:         'e' in person['last'] or
...:         'e' in person['email']):
...:         print("Found it!")
...:
...:
Found it!
Our code is now (in my mind) far more readable, thanks to the otherwise useless parentheses that I’ve added.
By the way, this is true for all parentheses. So if I want to define my dict on more than one line, I can say:
In [42]: person = {'first':'Reuven',
...:               'last':'Lerner',
...:               'email':'[email protected]'}
Python sees the opening { and is forgiving until it finds the matching }. In the same way, we can open a list comprehension on one line and close it on another. For years, I’ve written my list comprehensions on more than one line, in the belief that they’re easier to read, write, and understand. For example:
[one_number * one_number

for one_number in range(10)]
Square brackets — []
Creating lists
We can create lists with square brackets, as follows:
mylist = [ ]  # empty list

mylist = [10, 20, 30]  # list with three items
Note that according to PEP 8, you should write an empty list as [], without any space between the brackets. I’ve found that with certain fonts, the two brackets end up looking like a square, and are hard for people in my courses to read and understand. So I always put a space between the brackets when creating an empty list.
(And yes, I’m that rebellious in real life, not just when programming.)
We can use square brackets not just to create lists with explicitly named elements, but also to create lists via list comprehensions:
In [16]: [one_number * one_number
...: for one_number in range(10)]
...:
Out[16]: [0, 1, 4, 9, 16, 25, 36, 49, 64, 81]
The square brackets tell Python that this is a list comprehension, producing a list. If you use curly braces, you’ll get either a set or a dict back, and if you use regular parentheses, you’ll get a generator expression (see above).
Requesting individual items
Many people are surprised to discover that in Python, we always use square brackets to retrieve from a sequence or dictionary:
In [23]: mylist = [10, 20,30]

In [24]: t = (10, 20, 30)

In [25]: d = {'a':1, 'b':2, 'c':3}

In [26]: mylist[0]
Out[26]: 10

In [27]: t[1]
Out[27]: 20

In [28]: d['c']
Out[28]: 3
Why don’t we use regular parentheses with tuples and curly braces with dictionaries, when we want to retrieve an element? The simple answer is that square brackets, when used in this way, invoke a method — the __getitem__ method.
That’s right, there’s no difference between these two lines of code:
In [29]: d['c']
Out[29]: 3

In [30]: d.__getitem__('c')
Out[30]: 3
This means that if you define a new class, and you want instances of this class to be able to use square brackets, you just need to define __getitem__. For example:
In [31]: class Foo(object):
...:         def __init__(self, x):
...:             self.x = x
...:         def __getitem__(self, index):
...:             return self.x[index]
...:

In [32]: f = Foo('abcd')

In [33]: f[2]
Out[33]: 'c'
See? When we say f[2], that’s translated into f.__getitem__(2), which then returns “self.x[index]”.
The fact that square brackets are so generalized in this way means that Python can take advantage of them, even on user-created objects.
Requesting slices
You might also be familiar with slices. Slices are similar to individual indexes, except that they describe a range of indexes. For example:
In [46]: import string

In [47]: string.ascii_lowercase[10:20]
Out[47]: 'klmnopqrst'

In [48]: string.ascii_lowercase[10:20:3]
Out[48]: 'knqt'
As you can see, slices are either of the form [start:end+1] or [start:end+1:stepsize]. (If you don’t specify the stepsize, then it defaults to 1.)
Here’s a little tidbit that took me a long time to discover: You can get an IndexError exception if you ask for a single index beyond the boundaries of a sequence. But slices don’t have in such problems; they’ll just stop at the start or end of your string:
In [50]: string.ascii_lowercase[500]
---------------------------------------------------------------------------
IndexError Traceback (most recent call last)
<ipython-input-50-fad7a1a4ec3e> in <module>()
----> 1 string.ascii_lowercase[500]

IndexError: string index out of range


In [51]: string.ascii_lowercase[:500]
Out[51]: 'abcdefghijklmnopqrstuvwxyz'
How do the square brackets distinguish between an individual index and a slice? The answer: They don’t. In both cases, the __getitem__ method is being invoked. It’s up to __getitem__ to check to see what kind of value it got for the “index” parameter.
But wait: If we pass an integer or string (or even a tuple) to square brackets, we know what type will be passed along. What type is passed to our method if we use a slice?
In [55]: class Foo(object):
...:         def __getitem__(self, index):
...:             print(f"index = {index}, type(index) = {type(index)}")
...:


In [56]: f = Foo()

In [57]: f[100]
index = 100, type(index) = <class 'int'>

In [58]: f[5:100]
index = slice(5, 100, None), type(index) = <class 'slice'>

In [59]: f[5:100:3]
index = slice(5, 100, 3), type(index) = <class 'slice'>
Notice that in the first case, as expected, we get an integer. But in the second and third cases, we get a slice object. We can create these manually, if we want; “slice” is in the “bulitin” namespace, along with str, int, dict, and other favorites. And as you can see from its printed representation, we can call “slice” much as we do “range”, with start, stop, and step-size arguments. I haven’t often needed or wanted to create slice objects, but you certainly could:
In [60]: s = slice(5,20,4)

In [61]: string.ascii_lowercase[s]
Out[61]: 'fjnr'

In [62]: string.ascii_uppercase[s]
Out[62]: 'FJNR'

In [63]: string.ascii_letters[s]
Out[63]: 'fjnr'

In [64]: string.punctuation[s]
Out[64]: '&*.<'
Curly braces — {}
Creating dicts
The classic way to create dictionaries (dicts) in Python is with curly braces. You can create an empty dict with an empty pair of curly braces:
In [65]: d = {}
In [66]: len(d)
Out[66]: 0
Or you can pre-populate a dict with some key-value pairs:
In [67]: d = {‘a’:1, ‘b’:2, ‘c’:3}
In [68]: len(d)
Out[68]: 3
You can, of course, create dicts in a few other ways. In particular, you can use the “dict” class to create a dictionary based on a sequence of two-element sequences:
In [69]: dict(['ab', 'cd', 'ef'])
Out[69]: {'a': 'b', 'c': 'd', 'e': 'f'}

In [70]: d = dict([('a', 1), ('b', 2), ('c', 3)])

In [71]: d
Out[71]: {'a': 1, 'b': 2, 'c': 3}

In [72]: d = dict(['ab', 'cd', 'ef'])

In [73]: d
Out[73]: {'a': 'b', 'c': 'd', 'e': 'f'}
But unless you need to create a dict programmatically, I’d say that {} is the best and clearest way to go. I remember reading someone’s blog post a few years ago (which I cannot find right now) in which it was found that {} is faster than calling “dict” — which makes sense, since {} is part of Python’s syntax, and doesn’t require a function call.
Of course, {} can also be used to create a dictionary via a dict comprehension:
In [74]: { one_number : one_number*one_number
...:       for one_number in range(10) }
...:
Out[74]: {0: 0, 1: 1, 2: 4, 3: 9, 4: 16, 5: 25, 6: 36, 7: 49, 8: 64, 9: 81}
In the above code, we create a dict of the number 0-9 (keys) and their values to the second power (values).
Remember that a dict comprehension creates one dictionary, rather than a list containing many dictionaries.
Create sets
I’ve become quite the fan of Python’s sets. You can think of sets in a technical sense, namely that they are mutable, and contain unique, hashable values. As of Python 3.6, they are stored in insertion order.
But really, it’s just easiest to think of sets as dictionaries without any values. (Yes, this means that sets are nothing more than immoral dictionaries.) Whatever applies to dict keys also applies to the elements of a set.
We can create a set with curly braces:
In [75]: s = {10,20,30}
In [76]: type(s)
Out[76]: set
As you can see, the fact that there is no colon (:) between the name-value pairs allows Python to parse this code correctly, defining ‘s” to be a set, rather than a dict.
Nearly every time I teach about sets, someone tries to create an empty set and add to it, using set.add:
In [77]: s = {}
In [78]: s.add(10)
—————————————————————————
AttributeError Traceback (most recent call last)
<ipython-input-78-721f80ddfefc> in <module>()
—-> 1 s.add(10)
AttributeError: ‘dict’ object has no attribute ‘add’
The error indicates that “s” is a dict, and that dicts lack the “add” method. Which is fine, but didn’t I define “s” to be a set?
Not really: Dicts came first, and thus {} is an empty dict, not an empty set. If you want to create an empty set, you’ll need to use the “set” class:
s = set()

s.add(10)
This works just fine, but is a bit confusing to people starting off in Python.
I often use sets to remove duplicate entries from a list. I can do this with the “set” class (callable), but I can also use the “* argument” syntax when calling a function:
In [79]: mylist = [10, 20, 30, 10, 20, 30, 40]

In [80]: s = {*mylist}

In [81]: s
Out[81]: {10, 20, 30, 40}
Note that there’s a bit difference between {*mylist} (which creates a set from the elements of mylist) and {mylist} which will try to create a set with one element, the list “mylist”, and will fail because lists are unhashable.
Just as we have list comprehensions and dict comprehensions, we also have set comprehensions, which means that we can also say:
In [84]: mylist = [10, 20, 30, 10, 20, 30, 40]

In [85]: {one_number
...: for one_number in mylist}
...:
Out[85]: {10, 20, 30, 40}
str.format
Another place where we can use curly braces is in string formatting. Whereas Python developers used to use the printf-style “%” operator to create new strings, the modern way to do so (until f-strings, see below) was the str.format method. It worked like this:
In [86]: name = ‘Reuven’
In [87]: “Hello, {0}”.format(name)
Out[87]: ‘Hello, Reuven’
Notice that str.format returns a new string; it doesn’t technically have anything to do with “print”, although they are often used together. You can assign the resulting string to a new variable, write it to a file, or (of course) print it to the screen.
str.format looks inside of the string, searching for curly braces with a number inside of them. It then grabs the argument with that index, and interpolates it into the resulting string. For example:
In [88]: 'First is {0}, then is {1}, finally is {2}'.format(10, 20, 30)
Out[88]: 'First is 10, then is 20, finally is 30'
You can, of course, mix things up:
In [89]: 'First is {0}, finally is {2}, then is {1}'.format(10, 20, 30)
Out[89]: 'First is 10, finally is 30, then is 20'
You can also repeat values:
In [90]: 'First is {0}. Really, first is {0}. Then is {1}'.format(10, 20, 30)
Out[90]: 'First is 10. Really, first is 10. Then is 20'
If you’ll be using each argument once and in order, you can even remove the numbers — although I’ve been told that this makes the code hard to read. And besides, it means you cannot repeat values, which is sometimes annoying:
In [91]: 'First is {}, then is {}, finally is {}'.format(10, 20, 30)
Out[91]: 'First is 10, then is 20, finally is 30'
You cannot switch from automatic to manual numbering in curly braces (or back):
In [92]: 'First is {0}, then is {}, finally is {}'.format(10, 20, 30)
---------------------------------------------------------------------------
ValueError Traceback (most recent call last)
<ipython-input-92-f00f3adf93eb> in <module>()
----> 1 'First is {0}, then is {}, finally is {}'.format(10, 20, 30)

ValueError: cannot switch from manual field specification to automatic field numbering
str.format also lets you use names instead of values, by passing keyword arguments (i.e., name-value pairs in the format of key=value):
In [93]: 'First is {x}, then is {y}, finally is {z}'.format(x=10, y=20, z=30)
Out[93]: 'First is 10, then is 20, finally is 30'
You can mix positional and keyword arguments, but I beg that you not do that:
In [94]: 'First is {0}, then is {y}, finally is {z}'.format(10, y=20, z=30)
Out[94]: 'First is 10, then is 20, finally is 30'
f-strings
As of Python 3.6, we have an even more modern way to perform string interpolation, using “f-strings”. Putting “f” before the opening quotes allows us to use curly braces to interpolate just about any Python expression we want — from variable names to operations to function/method calls — inside of a string:
In [99]: name = 'Reuven'

In [100]: f"Hello, {name}"
Out[100]: 'Hello, Reuven'

In [101]: f"Hello, {name.upper()}"
Out[101]: 'Hello, REUVEN'

In [102]: f"Hello, {name.split('e')}"
Out[102]: "Hello, ['R', 'uv', 'n']"
I love f-strings, and have started to use them in all of my code. bash, Perl, Ruby, and PHP have had this capability for years; I’m delighted to (finally) have it in Python, too!
from __future__ import braces
Do you sometimes wish that you could use curly braces instead of indentation in Python? Yeah, you’re not alone. Fortunately, the __future__ module is Python’s way of letting you try new features before they’re completely baked into your current Python version. For example, if you’re still using Python 2.7, you can say
from __future__ import division
and division will always return a float, rather than an integer, even if the two operands are integers.
So go ahead, try:
from __future__ import braces
(Yes, this is part of Python. And no, don’t expect to be able to use curly braces instead of indentation any time soon.)
Enjoyed this article? Join more than 11,000 other developers who receive my free, weekly “Better developers” newsletter. Every Monday, you’ll get an article like this one about software development and Python:
Email Address
Name
Website
[Update] [Project Solution] Tree Searching : DFS, BFS … step by step – TAmemo.com | parenthesis คือ – NATAVIGUIDES
บทความนี้ย้ายบล๊อกมาจาก nartra.blogspot.com กำลังรีไรท์
DFS & BFS
วิธีการค้นหาข้อมูลใน Tree (โครงสร้างข้อมูลแบบ Tree คืออะไรถ้ายังไม่รู้ให้ไปอ่านก่อนที่ label/Tree) สำหรับ Tree ทุกรูปแบบ ใช้ 2 วิธีนี้ได้หมด
เรียกว่าเป็นวิธีมาตราฐานของการ Tree Searching กันเลยถึงแม้ว่าประสิทธิภาพมันจะไม่ค่อยดีเท่าไหร่ก็ตามล่ะนะ

Depth-First Search
หรือ “การค้นหาตามแนวลึก” วิธีการคือพุ่งตรงดึงเข้าไปก่อนเลย สุดทางแล้วค่อยถอยกลับมาแล้วหาทางใหม่ลองไปเรื่อยๆ
ถ้าเราจะเรียบเทียบกับรูปข้างบน เราต้องการจะหาคนๆ หนึ่งซึ่งเป็นเพื่อนเราที่อยู่กลางฝูงชนมากมาย เราก็จะทำแบบนี้

หาแบบเป็นแนวตรงดึงเข้าไปเลย ซึ่งถ้าไม่เจอเราก็ลองหาทางใหม่ดู
ทีนี้ลองมาดูโครงสร้างแบบ Tree จริงๆ กันบ้าง
ป.ล.ขอยกตัวอย่างด้วย Binary Tree เพราะมันง่ายดี
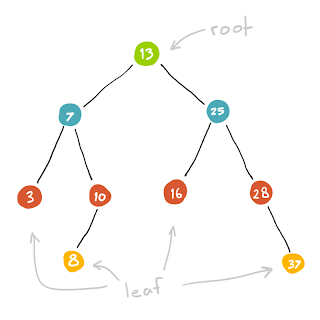
เริ่มต้นด้วย Tree 1 ตัว
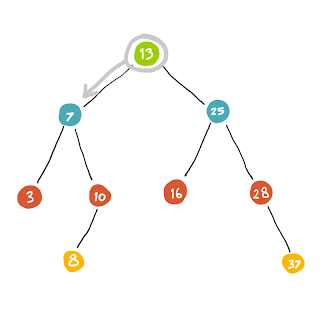
หาจาก root เป็นลำดับแรก เมื่อยังหาไม่เจอ เราก็จะทำกาเขยิบไปตัวต่อไปซึ่งก็คือ child ของมันสักตัวนึงที่เรายังไม่เคยผ่านมากก่อน

เราถอยกลับมาที่ (7) ซึ่ง child ของ (7) มี (3) และ (10) … สำหรับ (3) นั้นเพิ่งเดินผ่านมันมา เราก็เลยเลือก (10) เป็นตัวถัดไปแทน
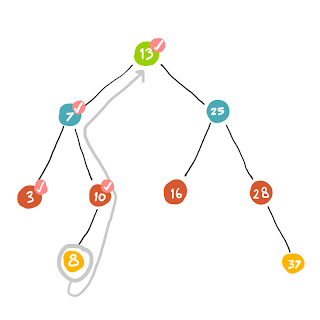
พอ (8) ไปต่อไม่ได้แล้วเราก็ถอยกลับไปที่ (10) ซึ่ง (10) ก็ไม่มี child เหลืออีกแล้ว (นับเฉพาะ child ที่ยังไม่เคยผ่านไป) ก็เลยถอยกลับไปที่ (7) .. และเช่นเดียวกัน (7) ไม่มี child ที่ยังไม่เคยไปแล้ว ดังนั้นจึงย้อนกลับไปที่ (13) ซึ่งเป็น root
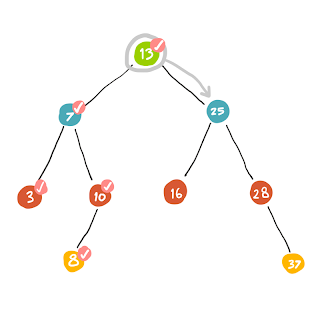
เมื่อเรามาถึง root .. ฝั่งซ้ายนั้นเราทำการค้นหาไปหมดแล้ว ลำดับต่อไปก็เลยจะไปหาทางขวาแทน (ซึ่งทางขวาก็ทำเหมือนฝั่งซ้ายนั่นแล)
Breadth-First Search
หรือ “การค้นหาตามแนวกว้าง” วิธีนี้เป็นการมองหาแบบกว้างๆ ทีละชั้น หาไล่ไปเรื่อยๆ ถ้ารอบตัวชั้นแรกยังหาไม่เจอ ก็ไปหาชั้นที่อยู่ถัดไปแบบนี้ไปเรื่อยๆ

เราจะแบ่ง Tree ออกเป็นชั้นๆ (หรือเรียกว่า Level) เริ่มตั้งแต่ level 0, 1, 2, … n

การหาครั้งที่ 1 นั้นจะหาตัวที่อยู่ชั้นบนสุด
แล้วก็หา Node ในชั้นต่อไปเรื่อยๆ
In Action
โปรเจคนี้เป็น workshop ที่จะให้อ่าน input ซึ่งบรรทัดแรกจะเป็น data ที่ใส่เข้าไปใน Tree เป็นค่าตั้งต้น (วิธีการเขียน Tree และการ insert ข้อมูลใส่เข้าไปหาอ่านได้ที่ ตัวอย่างคลาส Tree แบบง่าย)
ส่วนในบรรทัดต่อไป (มีอีกกี่บรรทัดก็ได้) จะเป็นคำสั่งให้ทำการ search ข้อมูลใน Tree ในรูปแบบ BFS และ DFS เช่นในบรรทัดแรก BFS(28)หมายความว่าให้หา (28) ด้วยวิธีแบบ BFS
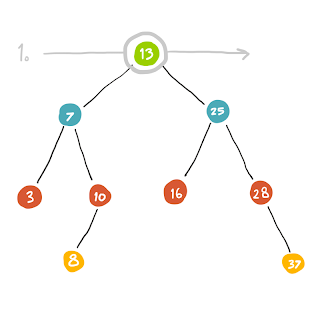
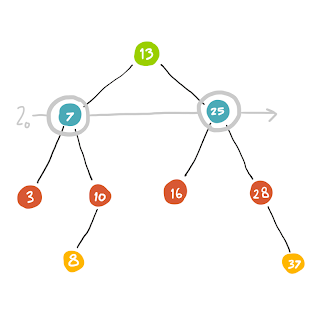
13 7 25 3 10 16 28 8 37
 BFS(28)
 DFS(28)
 BFS(90)
เวลาเอาไปรันก็จะได้ผล output ประมาณนี้
Found: 28
 Sum: 74
 Path: 13 7 25 3 10 16

Found: 28
 Sum: 82
 Path: 13 7 3 10 8 25 16

Not Found: 90
 Sum: 0
Sum และ Path จะเป็นตัวบอกว่า Node ที่เราหาเป็นทางผ่านกว่าจะเจอผลลัพท์มีค่ารวมและผ่าน Node ตัวไหนมาแล้วบ้าง
method BFS
public void BFS(int value) {
    int sum = 0;
    ArrayList<Node> path = new ArrayList<Node>();
    Queue<Node> next = new LinkedList<Node>();

    //ทำการหาแบบ BFS

    //ปริ๊นค่าผลลัพท์ว่าหาเจอหรือเปล่า
}
เราก็เขียน method BFS ขึ้นมา โดยเราจะต้องกำหนดค่าเริ่มต้นก่อน ซึ่งตัวที่เราจะต้องใช้เป็นดังนี้
- ค่า sum เพื่อเก็บว่าเส้นทางที่ผ่านมาเรามีผลรวมเป็นเท่าไหร่
- path (เป็น ArrayList) เอาไว้เก็บว่า Node ไหนที่เราเดินผ่านมาแล้วบ้าง
- next เป็น queue เอาไว้เก็บว่า Node ที่เราควรจะหาเป็นตัวถัดไปเป็นตัวไหน
*สำหรับ Java นั้นมีคลาส Queue ให้เรียกใช้อยู่แล้ว (เอ่อ จริงๆ ไม่แค่ Queue หรอกนะ Stack และ Tree มันก็มีให้ใช้ = =” )
แต่ จะเรียกมันว่า class ก็ไม่ถูกต้องเรียกว่า interface มากกว่า เพราะรูปแบบการสร้าง Queue ต้องเลือกว่าเราจะให้ Queue ของเราใช้รูปแบบไหนในการเก็บ ซึ่งตัวอย่างนี้เลือกใช้รูปแบบ LinkedList (แต่ไม่ว่าเราจะใช้โครงสร้างแบบไหน มันก็เป็นวิธีการที่ Queue จะจัดการให้โดยเราไม่ต้องสนใจมันก็ได้นะ)
เราใช้ Queue ในการหาแบบ BFS เพราะการ search หาทีละชั้นสามารถคุมได้ด้วย Queue
ตัวอย่างเช่น .. จาก Tree รูปข้างบน
เราหา (13) เป็นตัวแรก child ของ (13) นั้นมี 2 ตัวคือ (7) กับ (25) เราก็เอา (7)(25) ใส่ Queue ไว้
Queue: (7) (25)
ดังนั้นเมื่อเราต้องการรู้ว่า Node ต่อไปเราจะไปไหนต่อดี เราก็จะจัดการ poll ข้อมูลออกมาจาก Queue
(7) <-- Queue: (25)
เรา จะได้ว่า (7) คือตัวต่อไปที่เราจะต้องไป visit แล้วก็ทำเหมือนเดิมคือเมื่อเรามาถึง (7) แล้วก็จัดการเอา child ทุกตัวของมันใส่เข้าไปใน Queue จะได้ประมาณนี้
Queue: (25) (3) (10)
พอจะไปตัวต่อไปก็ทำเช่นเดิมคือ poll ข้อมูลออกมา
(25) <-- Queue: (3) (10)
เราก็ไป visit ที่ Node นั้น .. แล้วก็ทำแบบนี้ไปเรื่อยๆ เรื่อยๆ เรื่อยๆ นะ (ฮา)
อันดับต่อไปเราก็จะเริ่มทำการวนหา Node ที่มีค่า .data เท่ากับ value ที่เรารับมาตอนแรก
Node cur = root; while (
cur != null
&&cur.data != value
) { sum += cur.data; path.add(cur); next.add(cur.leftChild); next.add(cur.rightChild);cur = next.isEmpty() ? null : next.poll();
}
ในขั้นแรก เราสร้าง cur (current) ขึ้นมาเพื่อเอาไว้เก็บว่าตอนนี้เราหาถึงตอนไหนแล้ว
และเลือกใช้ while loop เพราะไม่รู้ว่ามันต้องใช้กี่ครั้งกว่าจะหาเจอ และใส่เงื่อนไขว่าเราจะทำการหาต่อไปถ้า..
-
Node ที่เรากำลังหามาถึงในตอนนี้ ไม่ใช่ null (หมายความว่ายังมี Node ให้หาอยู่)
-
data ของ Node ตัวที่เราหาอยู่ยังไม่ตรงกับ
value
ที่จะหา (ยังไม่ตรงก็หาไปเรื่อยๆ ไงล่ะ)
โดยในแต่ละรอบต้องทำการ บวกค่าของ Node ที่เดินทางผ่านมาเข้าไปใน sum และ เพิ่ม Node ตัวนั้นเข้าไปใน path และจบด้วยการที่เอา leftChild กับ rightChild ใส่ลงไปใน queue ซะ
ส่วนบรรทัดสุดท้ายนั้นคือการ อัพเดต current Node เป็นตัวถัดไป (ดึงออกมาจาก queue) และใช้เงื่อนไขว่า ถ้า queue ไม่มีข้อมูลให้ดึงมาใช้แล้ว (.isEmpty) ตัว cur ของเราจะมีค่าเป็น null แต่ถ้ายังดึงได้ก็จัดการดึงออกมา (.poll)
*บรรทัดสุดท้ายเป็นรูปย่อของการเขียนแบบ
if(next.isEmpty()){
 cur = null;
 }
 else{
 cur = next.poll();
 }
หลังจากหาเสร็จ เราก็เช็กว่า cur != null หรือเปล่า ถ้ามันไม่เป็น null ก็แปลว่าเราหาเจอ เราก็ปริ๊นค่าผลลัพท์ออกไป เป็นอันจบ
 if (cur != null) {
     System.out.println("Found: " + value);
     System.out.println("Sum: " + sum);
     System.out.print("Path: ");
     for (Node p : path) {
         System.out.print(p.data + " ");
     }
     System.out.println();
 }
 else {
     System.out.println("Not Found: " + value);
     System.out.println("Sum: 0");
}
method DFS
public void DFS(int value) {
    int sum = 0;
    ArrayList<Node> path = new ArrayList<Node>();
    Stack<Node> trackback = new Stack<Node>();

    //เซ็ตให้ Node ทุกตัวมี status เป็น visited = false คือยังไม่เคยเดินผ่านมา

    //ทำการหาแบบ DFS

    //ปริ๊นค่าผลลัพท์ว่าหาเจอหรือเปล่า
}
ในการทำ DFS นั้นมีขั้นตอนคร่าวๆ คล้ายๆ กับ BFS แต่ต้องเพิ่มขั้นตอนในการเซ็ตค่าเพื่อบอกว่า Node
ใน Tree ต้นนี้ยังไม่เคยค้นหาผ่านมาก่อน (เริ่มแรกต้องยังไม่มี Node ตัวไหนเคยผ่านมาก่อนอยู่แล้วล่ะ)
และ การหาแบบ BFS เราใช้ queue แต่ถ้าเป็น DFS เราจะใช้ stack แทนเพื่อเก็บว่าทางที่ผ่านมาของเราเป็นตัวอะไร จะได้ย้อนกลับทางเดิมได้ถูก
Node cur = root;
while (cur != null && cur.data != value) {

    if (!cur.visited) {
        sum += cur.data;
        path.add(cur);
    }
    cur.visited = true;

    //จัดการเขยิบไป Node ที่ควรหาเป็นตัวถัดไปนะ
}
เงื่อนไขก็คล้ายๆ ของเดิมล่ะนะ สำหรับ BFS เราเริ่มโดยการ เพิ่มค่าเข้าไปใน sum และบันทึกเข้าไปใน path ที่ผ่านมา
แต่ สำหรับ DFS นั้นไม่สามารถทำแบบนั้นได้ เราต้องเช็กดูก่อนว่า Node ตัวนั้นยังไม่เคยผ่านมาก่อนถึงจะทำการบันทึกได้ (ถ้ามันผ่านมาแล้ว ก็ไม่ต้องบันทึกเพราะมันเคยบันทึกไปก่อนหน้านี้แล้วนะ)
แล้วก็ตบท้ายด้วยการเซ็กให้ Node ตัวที่กำลังหาอยู่กลายเป็น visited คือเคยผ่านมาแล้ว ไม่ต้องเอามาคิดอีก
หลังจากนั้นเป็นสเต็ปการ “เขยิบไปตัวถัดไป” ซึ่งแยกได้เป็น 3 กรณีคือ..
- child ทางซ้าย/ขวา ยังลงไปหาต่อได้
- ไปต่อไปไม่ได้ต้องย้อนกลับไปทางเก่า (กลับไปหา parent)
- กรณีสุดท้ายคือไปต่อไม่ได้ ถอยกลับก็ไม่ได้ null มันซะเลย
if (cur.leftChild != null && !cur.leftChild.visited) {
    trackback.push(cur);
    cur = cur.leftChild;
}
else if (cur.rightChild != null && !cur.rightChild.visited) {
    trackback.push(cur);
    cur = cur.rightChild;
}
else if (!trackback.isEmpty()) {
    Node parent = trackback.pop();
    cur = parent;
}
else {
    cur = null;
}
ขั้นแรกเราก็เช็กว่าถ้าเราจะลงไปทางซ้ายเพื่อไปต่อ ก็ต้องเช็กว่ามี leftChild และ Node ต่อไปนั้นไม่เคยผ่านมาก่อนถึงจะลงไปได้
และ เพื่อให้รู้ว่าขากลับเราจะกลับทางไหน เราก็ต้องเพิ่ม Node ที่เราอยู่ในตอนนี้ใส่ใน trackback เพื่อตามรอยย้อนกลับได้แล้วจึงเขยิบลงไปทาง leftChild
*การเช็กฝั่ง rightChild ก็ทำแบบเดียวกัน
แต่ ถ้าลงไปไม่ได้ทั้งฝั่งซ้ายและฝั่งขวา เราก็จะย้อนกลับไปทางเดิมเพื่อหาว่ามีทางไหนที่ไปต่อได้อีกรึเปล่า วิธีการก็ไม่ยากหรอกแค่ pop ข้อมูลออกมาจาก trackback ก็จะรู้ว่าตัว parent ของมันต้องย้อนกลับไปไหนแล้ว
แต่ก่อนจะ pop ข้อมูลออกมาเราต้องเช็กก่อนว่า stack มีข้อมูลให้ pop รึเปล่าด้วยคำสั่ง isEmpty ถ้าไม่เหลืออะไรแล้วก็แปลว่า null เลย
แล้วสเต็ปสุดท้ายก็ปริ๊นผลออกไปด้วยโค้ดชุดเดียวกับ BFS เลย
เขียน main เพื่อสั่งงาน class ที่เขียนมาแล้ว
เราจะใช้ method readfile จากงานที่แล้ว http://nartra.blogspot.com/2013/10/project-solution-queue-step-by-step.html ในการอ่านไฟล์ input
static final int BFS = 1, DFS = 2;

public static void main(String[] args) {

String[] cmd = readFile("input.txt");

//first line
 String[] inputStr = cmd[0].split(" ");
 int i;
 int[] inputInt = new int[inputStr.length];
 for (i = 0; i < inputInt.length; i++) {
 inputInt[i] = Integer.parseInt(inputStr[i]);
 }

Tree tree = new Tree();

//ใส่เลขแต่ละตัวเข้าไป Tree
 for (i = 0; i < inputInt.length; i++) {
 tree.add(inputInt[i]);
 }

//บรรทัดต่อไปอ่านมาทีละคำสั่งโดยมี typeOfCommand เป็นตัวเช็กให้ว่ามันเป็นรูปแบบคำสั่งแบบ BFS หรือ DFS

}
เราก็เขียน main ขึ้นมาแล้วอ่านไฟล์คำสั่งเข้ามา
ในบรรทัดแรกมันคือข้อมูลที่เราจะใส่เข้าไปใน Tree เราก็ใช้ .split เพื่อตัดตัวเลขออกเป็นชิ้นเลขย่อยๆ แล้ว add เข้าไปใน Tree
เราจะใช้ method typeOfCommand จากงานที่แล้ว http://nartra.blogspot.com/2013/10/project-solution-queue-step-by-step.html อีกเช่นเคยแต่เปลี่ยนรูปแบบของ Regular Expression เป็น
static int typeOfCommand(String str) {
 str = str.trim();
 String BFS_format = "^(BFS)\\([0-9]+\\)$";
 String DFS_format = "^(DFS)\\([0-9]+\\)$";

Pattern pattern;
 Matcher matcher;

pattern = Pattern.compile(BFS_format);
 matcher = pattern.matcher(str);
 if (matcher.find()) {
 return BFS;
 }

pattern = Pattern.compile(DFS_format);
 matcher = pattern.matcher(str);
 if (matcher.find()) {
 return DFS;
 }
 return UNKNOWN;
 }
แต่ เราจะเพิ่ม method ตัวช่วยอีกตึวนึงเพื่อเอาไว้หาค่าว่า String ตัวนี้มีค่าเลขเป็นอะไร (ตัดทุกอย่างที่ไม่ใช่ตัวเลขทิ้ง แล้ว parseInt ซะ)
static int getValue(String str) {
 return Integer.parseInt(str.replaceAll("[^\\d]", ""));
 }
มาถึงจุดนี้เราก็วนลูปเช็กตั้งแต่บรรทัดที่ 2 (เพราะบรรทัดแรกเป็น data สำหรับ input ไปแล้ว) จากนั้นก็เช็กด้วย typeOfCommand ว่า type เป็น BFS หรือ DFS
//บรรทัดต่อไปอ่านมาทีละคำสั่งโดยมี
typeOfCommand
เป็นตัวเช็กให้ว่ามันเป็นรูปแบบคำสั่งแบบ BFS หรือ DFSfor (i = 1; i < cmd.length; i++) {
switch (typeOfCommand(cmd[i])) {
case BFS:
tree.BFS(getValue(cmd[i]));
break;
case DFS:
tree.DFS(getValue(cmd[i]));
break;
}
}
จากนั้นก็สั่งให้ tree ของเราค้นหาเลขตัวนั้นตามแบบ BFS หรือ DFS เป็นอันจบ
* ขอไม่รวม code ให้ละกัน ลองอ่านตามดูแล้วทำไปเรื่อยๆ step by step
1202 Total Views
3 Views Today
(2020) Brackets Explained in Coding / Easiest Explanation
What are the Differences between the different brackets used in coding? This is one of the most common questions beginners have (I’m a beginner too), so I figured I’ll explain in the simplest and easiest way so you can confidently continue learning coding.
I’ll cover the following types.
1. Parenthesis
2. Curly brackets
3. Box brackets
4. Angle brackets
5. Quotation
นอกจากการดูบทความนี้แล้ว คุณยังสามารถดูข้อมูลที่เป็นประโยชน์อื่นๆ อีกมากมายที่เราให้ไว้ที่นี่: ดูความรู้เพิ่มเติมที่นี่

Parenthesis Examples
Parenthesis Examples view this post on my website:
https://englishpronunciationroadmap.com/parenthesisexamples/
About this Video:
Do you know about parenthesis? We use it in English all the time. Do you know the typical intonation patterns when using parenthesis? In this video, these are exactly the things that I’m going to help you with.
….
In live speech, we think, feel and speak almost simultaneously, which means that part way through one thought we might need to add some extra information, give more context or express our feelings or opinions about what we have just said before continuing. This is parenthesis.
It tends to happen in the middle of an ongoing or developing thought, and so the pitch needs to reflect the fact that this is a supporting comment – a side note – but that that there is still more to come.
‘The issue with the way that he approaches these challenges – and this has been going on for some time – is that he focuses on the problem and not the solution’
Typically, the parenthetical comment tends to be spoken in a different pitch in the voice (to indicate that it is an additional/supporting comment) compared to what has come before and what will come after.
Have another listen:
‘The issue with the way that he approaches these challenges – and this has been going on for some time – is that he focuses on the problem and not the solution’
In addition to this, it is also typical for the pitch to rise on the final word of the parenthetical comment, to suggest that you are going to return to the main point.
Have another listen:
‘The issue with the way that he approaches these challenges – and this has been going on for some time – is that he focuses on the problem and not the solution’
Here’s another:
‘The scale of growth in these emerging markets – I’ll talk more specifically about the figures and statistics later on – is extraordinary’
So if you want to find this video easily again, click like, share it with a friend, and why not subscribe to this channel because I post weekly videos here every Tuesday at 8.30pm GMT local London time, so I hope to see you here next week.
About this Channel:
This is the dedicated YouTube channel for English Pronunciation Roadmap the online learning hub for all native and nonnative English speakers who want to fasttrack their speech and pronunciation skills and speak standard British English with more clarity, confidence and fluency.
Click Subscribe:
Click subscribe to be firstinline to get all of our relevant and useful weekly video posts.
Then head over to the website for FREE downloads, testimonials of other members and some amazing products and services. Signup for FREE and join the community today!
http://englishpronunciationroadmap.com
And be sure to check out this other post:
5 British Pronunciation Hacks: How To Bridge The Gap Between Spellings And Speech
http://englishpronunciationroadmap.com/5britishpronunciationhacks/
At the bottom of the post there is a musthave FREE download.
Social Media:
To get get frontrow seats to all our content and updates, join us on:
Facebook:
https://www.facebook.com/EnglishPronunciationRoadmap/
Twitter:
https://twitter.com/clearandfluent
Linkedin
https://www.linkedin.com/company/englishpronunciationroadmap
Google+
https://plus.google.com/b/107527932022878100794/107527932022878100794/about/p/pub
P.S remember to scroll down, leave a comment, give me a thumbs up or thumbs down, either way just give me a reaction, subscribe to my channel, like my page and I’ll speak to you soon.

สงครามไซเบอร์รูปแบบใหม่
สงครามไซเบอร์ในปัจจุบัน มีรูปแบบที่พัฒนาไปไกลถึงขั้นการตั้งป้อมยิงโจมตีอีกฝ่าย ด้วยรูปแบบใหม่ๆ ซึ่งการโจมตีที่นิยมมากที่สุดในปัจจุบันคือ DDos (Distributed Denial of Service) เพื่อให้ Server เป้าหมายใช้งานไม่ได้ แน่นอนว่าผู้ใช้อย่างเราไม่ค่อยจะรู้สึกหรอกครับ เพราะเทคโนโลยีด้าน Security เองก็ได้พัฒนาตามไม่แพ้กัน วันนี้เราจะไปทำความรู้จักกับรูปแบบการทำสงครามไซเบอร์รูปแบบนี้กัน
บริษัท Norse ที่ทำธุรกิจด้านการรักษาความปลอดภัยระบบอินเตอร์เน็ตของสหรัฐฯ ซึ่งเปิดตัวเว็บไซต์ http://map.ipviking.com แสดงแผนที่ตรวจจับการก่อเหตุ เจาะระบบจารกรรมข้อมูลออนไลน์ทั่วโลก หรือ “แฮกกิ้งแมพ” ซึ่งแสดงข้อมูลตามเวลาที่เกิดเหตุการณ์ขึ้นจริง หรือแบบ“เรียลไทม์” พร้อมกับมีสถิติให้ดูด้วยว่า เป้าหมายที่โดนมากที่สุดคือที่ใด แล้วต้นตอมาจากที่ใด และมีรูปแบบการโจมตีแบบใดที่ใช้กันเยอะที่สุด
จากข้อมูลพบว่า สหรัฐฯ เป็นประเทศที่ถูกกลุ่มแฮกเกอร์ หรือกลุ่มอาชญากรคอมพิวเตอร์ ก่อเหตุโจมตีระบบฐานข้อมูลเครือข่ายอินเตอร์เน็ตมากเป็นอันดับที่ 1 ของโลก
ขณะที่จีนเป็นประเทศต้นทางที่มีการก่อเหตุเจาะระบบโจมตีเครือข่ายอินเตอร์เน็ตเกิดขึ้นมากที่สุดในโลก ตามด้วยสหรัฐฯ โดยหน่วยงานรัฐบาลสหรัฐฯตกเป็นเป้าโจมตีของกลุ่มแฮกเกอร์มากที่สุดในโลก โดยเฉพาะเครือข่ายอินเตอร์เน็ตของกระทรวงกลาโหมสหรัฐฯ มีผู้พยายามก่อเหตุโจมตีสูงประมาณ 10 ล้านครั้งต่อ 1 วัน
จากสถิติที่เห็นใน แฮกกิ้งแมป เป็นเพียงบางส่วนเท่านั้น เพราะระบบนี้ยังไม่สามารถตรวจจับการโจมตีฐานข้อมูลคอมพิวเตอร์ที่เกิดขึ้นได้อย่างครอบคลุมทั้งหมด
ติดตามเราได้ที่ www.thairath.tv
Facebook : ThairathTV
Twitter : Thairath_TV
Instagram : ThairathTV

PUNCTUATION 📚 | English Grammar | How to use punctuation correctly
We hope you enjoyed this video! If you have any questions please ask in the comments.
Please like subscribe and share your comments with us!
⬇︎⬇︎⬇︎⬇︎⬇︎⬇︎⬇︎⬇︎⬇︎⬇︎⬇︎⬇︎⬇︎⬇︎⬇︎⬇︎⬇︎⬇︎⬇︎⬇︎⬇︎⬇︎⬇︎⬇︎⬇︎
➜ Ultimate punctuation guide: https://www.youtube.com/watch?v=tktKJWdLv10\u0026feature=youtu.be
⇢ ✅ Follow us on Instagram: https://www.instagram.com/ilearneasyenglish/
⇢ ✅ AMAZON 30DAY FREE TRIAL: https://amzn.to/39Bo067
FREE GRAMMAR CHECKER:
⇢ ✍🏼 📚 https://grammarly.go2cloud.org/SH2QH
RECOMMENDED BOOKS: 📚👩🏻💼
⇢ Fantasic Mr Fox book: https://amzn.to/31b3Pb5
⇢ Fantastic Mr Fox audiobook: https://amzn.to/2XfwBX0
⇢ Harry Potter book: https://amzn.to/316UVvw
⇢ Harry Potter audiobook: https://amzn.to/31at6lQ
GRAMMAR BOOKS 📚
⇢ 📕 Beginner level: https://amzn.to/3fhEOjF
⇢ 📘 Intermediate level: https://amzn.to/2Pdgl4i
⇢ 📗 Advanced level: https://amzn.to/2BNSg10
English shows to watch: 🖥
⇢ Fantastic Mr Fox: https://amzn.to/3k8cTqf
⇢ Harry Potter: https://amzn.to/30gzskw
⇢ Sherlock Holmes: https://amzn.to/2EwpLpx
⇢ 🎙Microphone I use: https://amzn.to/3jTSyED
Links marked with an are affiliate links.
List of separate videos:
➜ Full stop: https://www.youtube.com/watch?v=uVUon6lfNDw\u0026t=10s
➜ Comma: https://www.youtube.com/watch?v=TED0zEyrICY\u0026t=1s
➜ Exclamation mark: https://www.youtube.com/watch?v=acKCAj6CukY\u0026t=2s
➜ Question mark: https://www.youtube.com/watch?v=Gn9RVS08x1U\u0026t=1s
➜ Quotation marks: https://www.youtube.com/watch?v=yqp9fdv1pT8\u0026t=1s
➜ Colon: https://www.youtube.com/watch?v=NKWdStFFkj8\u0026t=3s
➜ Semi colon: https://www.youtube.com/watch?v=Y0nB_uDTr4w\u0026t=100s
➜ Apostrophe: https://www.youtube.com/watch?v=NrrG0aZLgZM\u0026t=2s
➜ Parenthesis/brackets: https://www.youtube.com/watch?v=PZzZ4gO7E2I\u0026t=1s
➜ Ellipsis: https://www.youtube.com/watch?v=MvuxyBPvEB4\u0026t=1s
➜ Hyphen: https://www.youtube.com/watch?v=HaJqqlzcf6M\u0026t=3s
➜ En dash \u0026 en dash: https://www.youtube.com/watch?v=JiQVQVIiohc
➜ Slash: https://www.youtube.com/watch?v=BImA2_ZRo
Time stamps:
0:00 Intro
0:12 What is punctuation?
0:26 Why do we need punctuation?
0:44 Full stop
1:05 Comma
1:55 Question mark
2:20 Exclamation mark
2:45 Quotation mark
3:20 Parentheses (Round brackets)
4:15 Square brackets
4:45 Slash
5:40 Hyphen
6:07 En dash
6:50 Em dash
7:25 Ellipsis points
Music: https://www.bensound.com
PARENTHESES \u0026 SQUARE BRACKETS | English grammar | How to use punctuation correctly
นอกจากการดูบทความนี้แล้ว คุณยังสามารถดูข้อมูลที่เป็นประโยชน์อื่นๆ อีกมากมายที่เราให้ไว้ที่นี่: ดูบทความเพิ่มเติมในหมวดหมู่LEARN FOREIGN LANGUAGE
ขอบคุณที่รับชมกระทู้ครับ parenthesis คือ